Can anyone help me to fix ”Display Driver Failed to Start” error message. For about last two week, I have been experiencing with some weird thing on my Windows 10 OS. Actually, the mis-happened start to occurs when I update my Windows 8 OS to Windows 10. Whenever I restarted my PC, the screen got frozen and after that it displayed “Display Driver Failed to Start” error. I have no idea how can I fix it. If you have any suggestion, please suggest me ASAP. Thanks in advance…

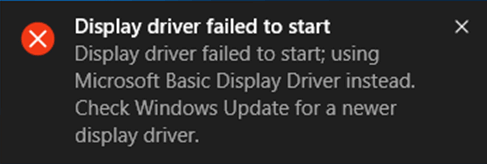
Know About “Display Driver Failed to Start” Error
The appearing of ‘Display Driver Failed to Start’ error message on your screen is a clear indication that something is problem with your Windows display driver. The exact culprit of this error is unclear but most of times, it occurs when System users upgraded Windows 10 devices. Behind this error message, there are numerous reasons responsible including System failed to recognize display drives, component incompatible with device and much more. Well, no need to be worry because you cab easily fix ‘ Display Driver Failed to Start’ error message by opting some easy tips. To get exact solution to fix, ‘Display Driver Failed to Start’ error message, you may visit a forum site.
4 Tips To Fix ‘Display Driver Failed to Start’ Error
Method 1 – Update Your Display Driver in Windows 10
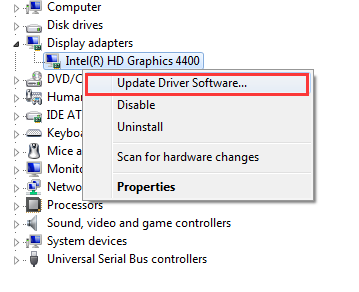
- Go to Start menu. Right click on it and choose ‘Device Manager’ option and click on it.

- Once your Device Manager is opened, click on the Display Adapter to expand it.
- On next window, right click on adapter and choose option of ‘Update Driver Software’.
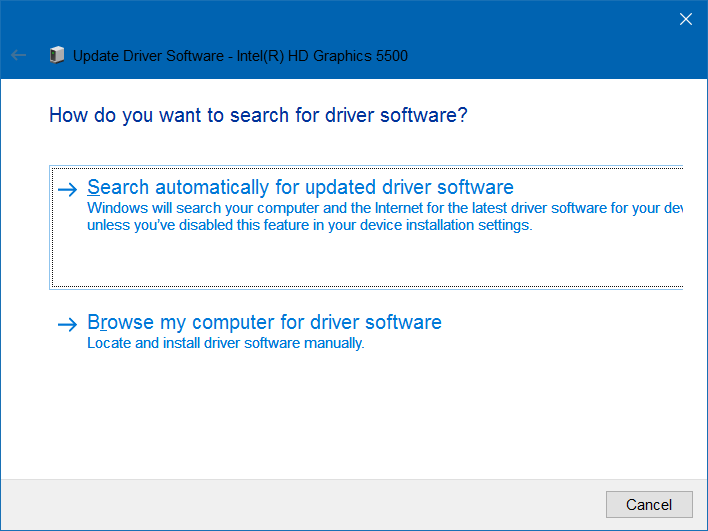
- Click on ‘Search automatically for updated driver software’ to initiate Windows 10 automatically search for the driver updates and install it.
Method 2 – Uninstall or Reinstall Display Driver in Windows 10
- Open your Device Manager and expand the section of Display Adapters.
- Right click on display driver option and choose option of Uninstall device.
- On the next Window, you have to mark on the check box labeled as ‘Delete the driver software from this device’ and then after click on Uninstall button.

- Now, restart your Windows 10 System and open the Device Manager once System boots up.
- Next, open the tab of Action and then click on option of ‘Scan for hardware changes’.
Method 3 – Enlarge The GPU Processing Time
- Press the key “Win+R’ together, type regedit in Run box and then after click on Enter key.
- Navigate HKEY_LOCAL_MACHINE -> SYSTEM -> CurrentControlSet -> Control.
- From the appearing window, click on ‘GrpahicsDrivers’ entry in left pane.
- Right click on the space in right pane and choose New -> DWORD (32-bit) Value.
- Name the new entry like TdrDelay and click on Enter key.
- Double click on TdrDelay registry and then after set its value from 0 to 8.
- To save the changes, click on OK button.
- Close the Registry Editor and restart your Windows 10 PC.
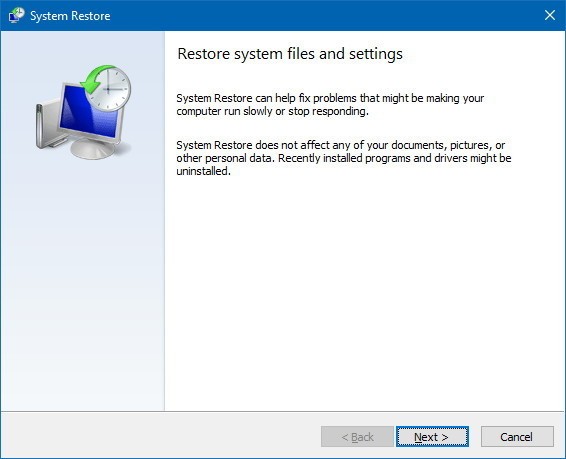
Method 4 : Use System Restore
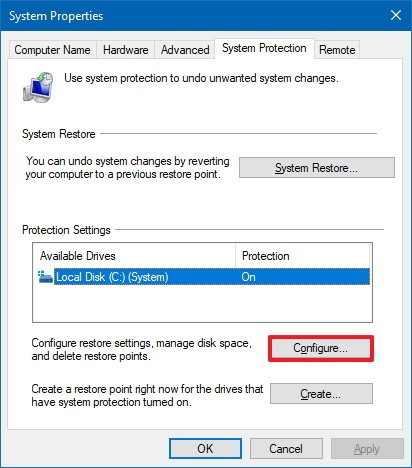
- Go to Start menu and type system restore in the Windows search box.
- Choose ‘Create a Restore Point’.
- Now, click on the ‘System Restore’ button and then after click on ‘Next’ button.
- On next window, choose System restore point and click on ‘Next’ button.
- If you are seeing only one System restore point then you must mark on the checkbox of ‘Show more restore points.
- Choose Restore point and then after click on the ‘Next’ button.
In order to finish the Computer restore, restart your PC.
Related Posts
 New AgeLocker Ransomware Abuses Legit ‘Age’ Encryption Tool
 Five Ways to Check If a Website Is Safe?
 Resolve The Recycle Bin on C:/ is corrupted Error on Windows 10
 (Resolved) Headphones Not Working In Windows 10
 Best Method To Fix The Javaw.exe Error On Windows
 (Resolved) 0X000000A5 Blue Screen Stop Error on Windows