
If you are looking to block Hard Drive Is Not Accepted Pop-Ups on your system then you should follow the below given tricks for complete removal.
Hard Drive Is Not Accepted Pop-Ups : Latest investigation report

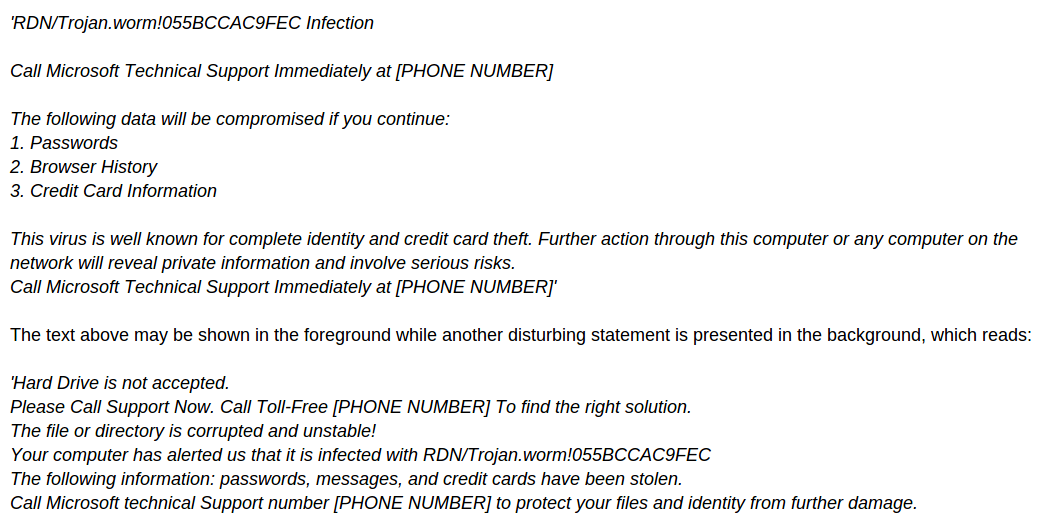
Hard Drive Is Not Accepted Pop-Ups is a fake alert that appears on your most used web browsers such as Google Chrome, Mozilla Firefox, Internet Explorer, Opera, Edge and similar others which is not to be trusted. Pop-ups like this "Fix corrupted CR2 files content completed " which claims to be featured the slogan as "Microsoft Security Warning" are not produced by services associated with Microsoft Corporation. This kind of pop-ups are generated on phishing pages that display fake system alerts and security warnings and convince the users to call for technical support that is supposed to be operated by certified PC experts. However this pop-up is delivered on your PC by the fraudsters and suggest to call on the numbers like "888-554-8150" and "888-886-7703" toll free numbers. You should avoid to call on these numbers because one of the members of cyber criminals are on the other side of the call which chat with as a certified system experts. It display pop-ups like
What are the ways of Hard Drive Is Not Accepted Pop-Ups intrusion on your system?
Hard Drive Is Not Accepted Pop-Ups uses stealth ways to enter inside of your system. This kind of unwanted programs comes while you trying to install any of the free software from third party website which is free absolutely free. You may not know that most of these free software make compromises with the malware developers to drop the malicious files into their source installer by which when the users install the source software then the adware infection files also got installed on the users system without getting their consent. Due to these of the reasons experts always recommended to use "Custom or Advanced" screen to install new programs on the system because it show installation list and also avoid suspicious installation.
Dealing with Hard Drive Is Not Accepted Pop-Ups
If you unfortunately getting pop-ups related with the above mentioned adware infection then you should use a trusted anti-malware to remove Hard Drive Is Not Accepted Pop-Ups from your compromised PC.
Click to Free Scan for Hard Drive Is Not Accepted Pop-Ups on PC

Know How to Remove Hard Drive Is Not Accepted Pop-Ups – Adware Manually from Web Browsers
Remove malicious Extension From Your Browser
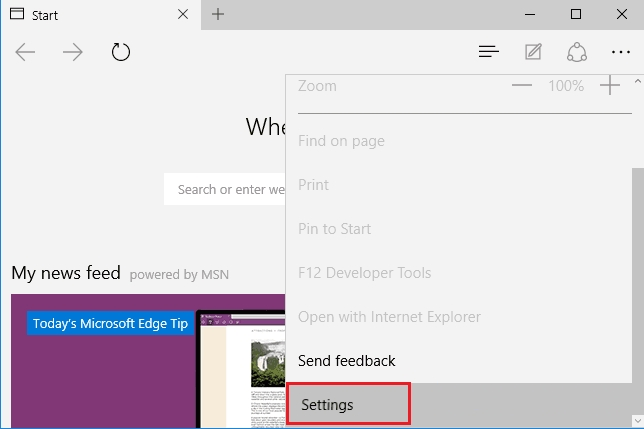
Hard Drive Is Not Accepted Pop-Ups Removal From Microsoft Edge
Step 1. Start your Microsoft Edge browser and go to More Actions (three dots “…”) option

Step 2. Here you need to select last Setting option.
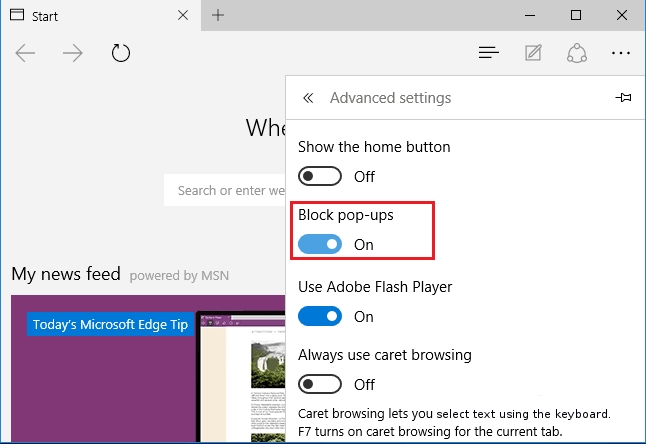
Step 3. Now you are advised to choose View Advance Settings option just below to Advance Settings.

Step 4. In this step you have to Turn ON Block pop-ups in order to block upcoming pop-ups.
Uninstall Hard Drive Is Not Accepted Pop-Ups From Google Chrome
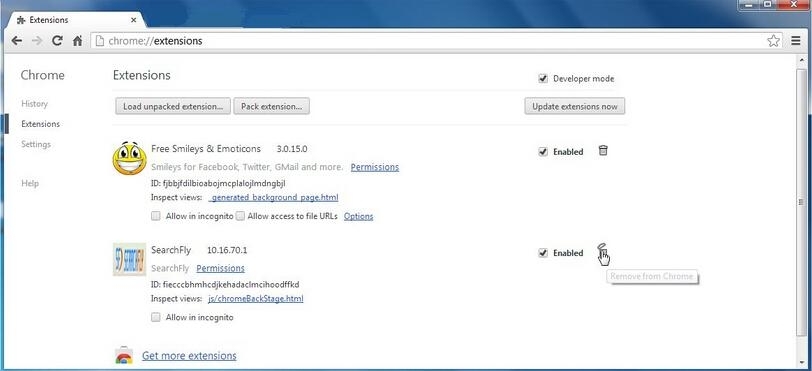
Step 1. Launch Google Chrome and select Menu option at the top right side of the window.
Step 2. Now Choose Tools >> Extensions.
Step 3. Here you only have to pick the unwanted extensions and click on remove button to delete Hard Drive Is Not Accepted Pop-Ups completely.
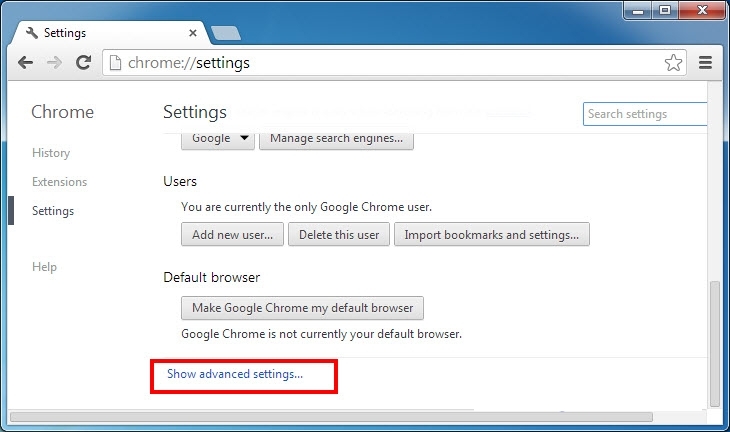
Step 4. Now go to Settings option and select Show Advance Settings.
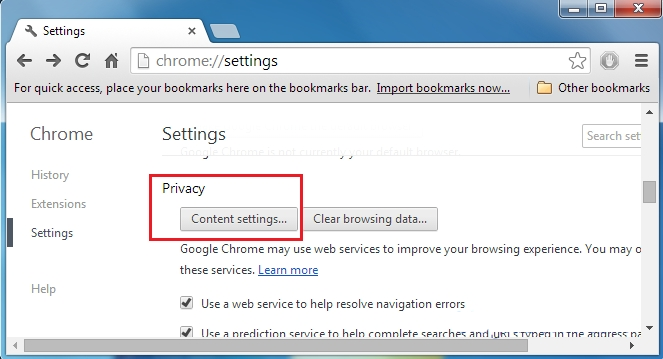
Step 5. Inside the Privacy option select Content Settings.
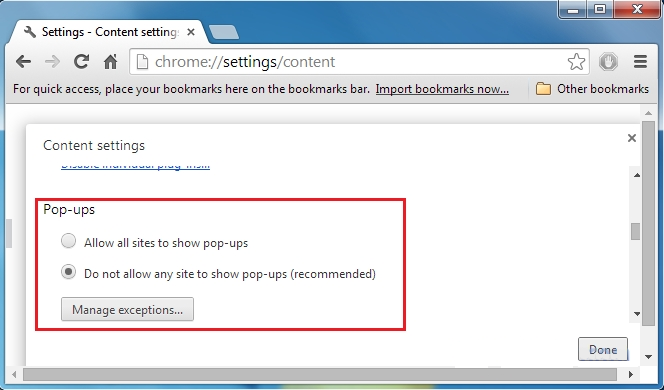
Step 6. Now pick Do not allow any site to show Pop-ups (recommended) option under “Pop-ups”.
Wipe Out Hard Drive Is Not Accepted Pop-Ups From Internet Explorer
Step 1 . Start Internet Explorer on your system.
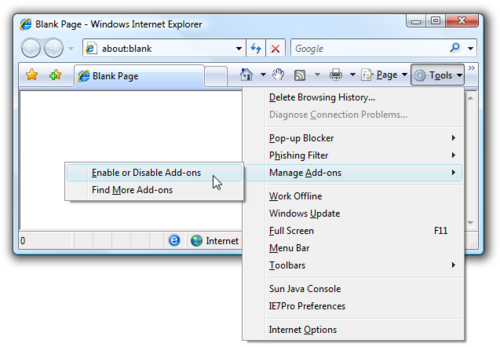
Step 2. Go to Tools option at the top right corner of the screen.
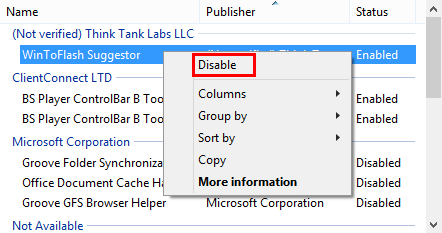
Step 3. Now select Manage Add-ons and click on Enable or Disable Add-ons that would be 5th option in the drop down list.
Step 4. Here you only need to choose those extension that want to remove and then tap on Disable option.
Step 5. Finally Press OK button to complete the process.
Clean Hard Drive Is Not Accepted Pop-Ups on Mozilla Firefox Browser
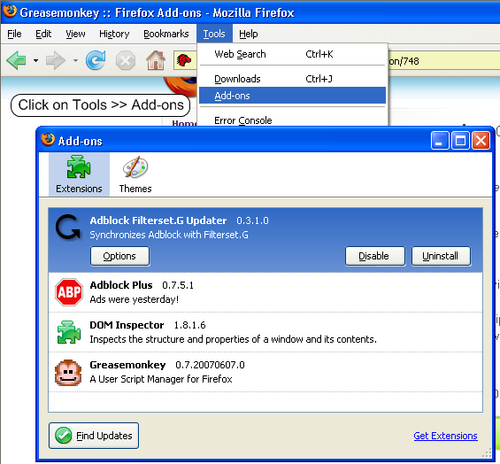
Step 1. Open Mozilla browser and select Tools option.
Step 2. Now choose Add-ons option.
Step 3. Here you can see all add-ons installed on your Mozilla browser and select unwanted one to disable or Uninstall Hard Drive Is Not Accepted Pop-Ups completely.
How to Reset Web Browsers to Uninstall Hard Drive Is Not Accepted Pop-Ups Completely
Hard Drive Is Not Accepted Pop-Ups Removal From Mozilla Firefox
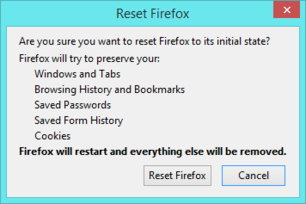
Step 1. Start Resetting Process with Firefox to Its Default Setting and for that you need to tap on Menu option and then click on Help icon at the end of drop down list.

Step 2. Here you should select Restart with Add-ons Disabled.

Step 3. Now a small window will appear where you need to pick Reset Firefox and not to click on Start in Safe Mode.

Step 4. Finally click on Reset Firefox again to complete the procedure.
Step to Reset Internet Explorer To Uninstall Hard Drive Is Not Accepted Pop-Ups Effectively
Step 1. First of all You need to launch your IE browser and choose “Internet options” the second last point from the drop down list.

Step 2. Here you need to choose Advance tab and then Tap on Reset option at the bottom of the current window.

Step 3. Again you should click on Reset button.

Step 4. Here you can see the progress in the process and when it gets done then click on Close button.
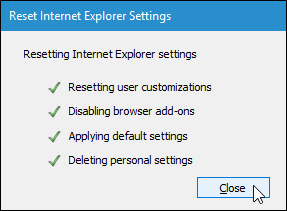
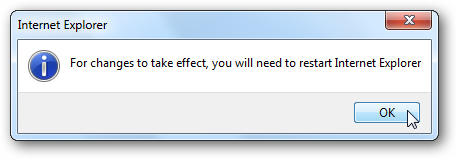
Step 5. Finally Click OK button to restart the Internet Explorer to make all changes in effect.
Clear Browsing History From Different Web Browsers
Deleting History on Microsoft Edge
- First of all Open Edge browser.
- Now Press CTRL + H to open history
- Here you need to choose required boxes which data you want to delete.
- At last click on Clear option.
Delete History From Internet Explorer
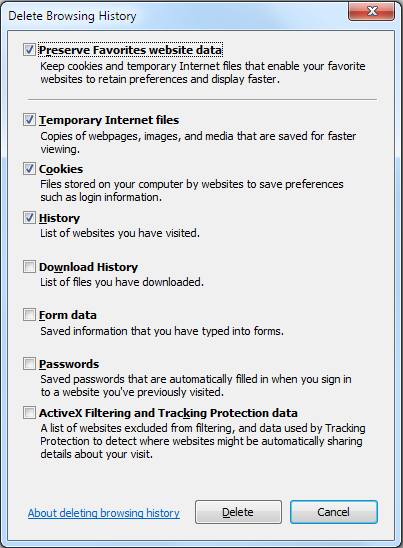
- Launch Internet Explorer browser
- Now Press CTRL + SHIFT + DEL button simultaneously to get history related options
- Now select those boxes who’s data you want to clear.
- Finally press Delete button.
Now Clear History of Mozilla Firefox
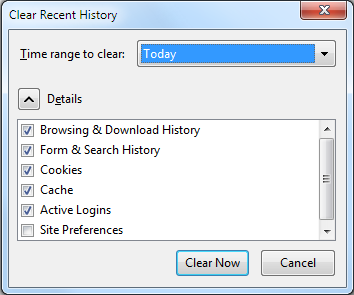
- To Start the process you have to launch Mozilla Firefox first.
- Now press CTRL + SHIFT + DEL button at a time.
- After that Select your required options and tap on Clear Now button.
Deleting History From Google Chrome

- Start Google Chrome browser
- Press CTRL + SHIFT + DEL to get options to delete browsing data.
- After that select Clear browsing Data option.

If you are still having issues in the removal of Hard Drive Is Not Accepted Pop-Ups from your compromised system then you can feel free to talk to our experts.

