

Two days before, I found Smart DNS Proxy within my windows computer and this annoying stuff is troubling me a lot. I am neither able to perform any system activity nor can surf internet normally. I really help in removing this nasty threat quickly. No matter how many time I launch my web browser, it popups again & again and irritates me a lot. I need guide to delete this stubborn threat from computer. Any help will be appreciated greatly. Thanks in advance!
Smart DNS Proxy is a potentially unwanted program which is classified as a frustrating adware threat. It has been created basically to interrupt you when you execute any application program or go for internet browsing. It is one of the most rigid and stubborn threat which once got slipped, does not leaves computer so easily. There must be in your mind who have developed this threat and for what motive. Well, you must know that Smart DNS Proxy has been launched by cyber criminals mainly to display various kinds of coupons, deals, special vouchers, promotional links and so on. Although, you might see such offers genuine or useful but the fact is, you have been promoted with various online advertisements mainly to get disturbed while browsing internet. As soon as Smart DNS Proxy got activated inside your machine, this very harmful affects web browsers like Chrome, Firefox, IE and Edge. All your compromised browser gets controlled by the cyber crooks and access your system remotely.
Being more specific, Smart DNS Proxy changes the default homepage and web browser settings and then after interrupts you while online searching. It brings infected computer at high risk and may cause severe corruption inside. You will be blocked to access any file or execute any application programs. Soon you will notice gradual reduction in system performance speed and the entire machine gets ruined badly. You might face loss of important data and your confidential details may get revealed to web hackers. So, if you want to surf Internet normally and secure system from severe danger, you must delete Smart DNS Proxy quickly when found.

Click to Free Scan for Smart DNS Proxy on PC
Uninstall Smart DNS Proxy From your Infected PC
Step:1 Remove Smart DNS Proxy or any Suspicious Program from Control Panel resulting in Pop-ups
- Click on Start and in Menu, Select Control Panel.
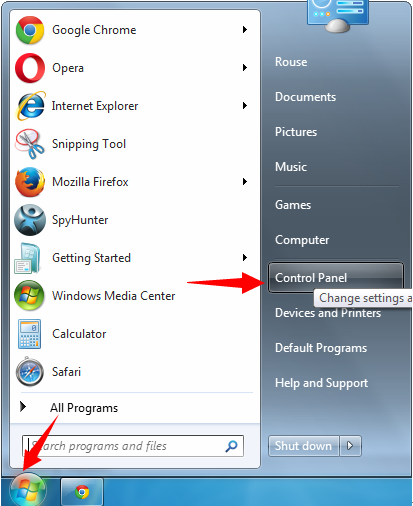
- In Control Panel, Search for Smart DNS Proxy or any suspicious program
- Once found, Click to Uninstall Smart DNS Proxy or related program from list of Programs

- However, if you are not sure do not Uninstall it as this will remove it permanently from the system.
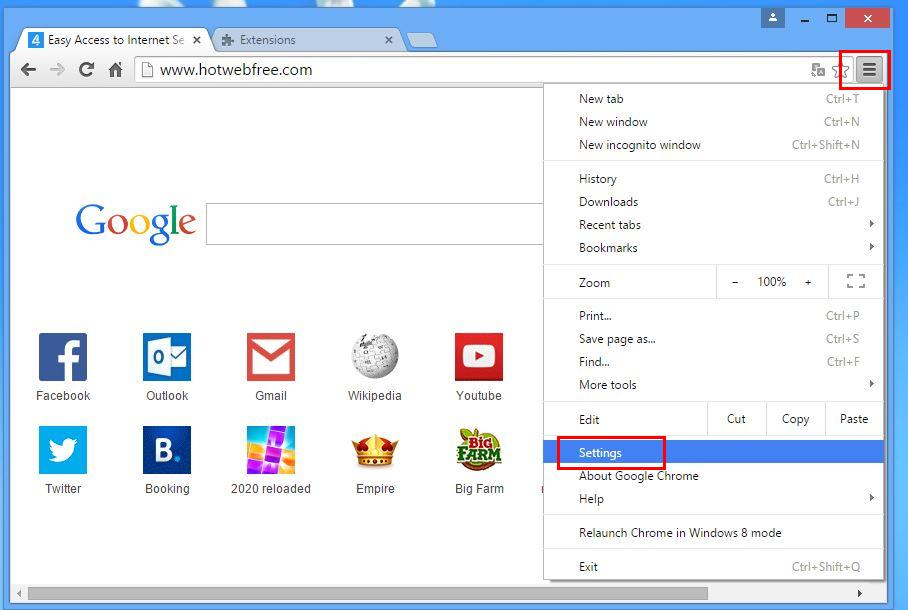
Step:2 How to Reset Google Chrome to Remove Smart DNS Proxy
- Open Google Chrome browser on your PC
- On the top right corner of the browser you will see 3 stripes option, click on it.
- After that click on Settings from the list of menus available on chrome’s panel.
- At the end of the page, a button is available with option to “Reset settings”.
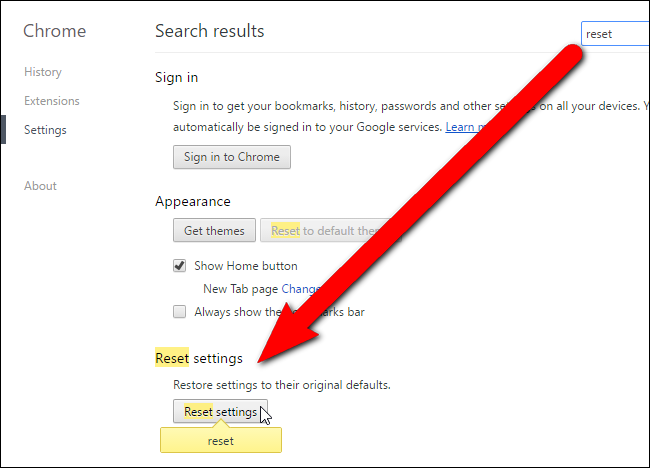
- Click on the button and get rid of Smart DNS Proxy from your Google Chrome.

How to Reset Mozilla Firefox to Uninstall Smart DNS Proxy
- Open Mozilla Firefox web browser and click on the options icon with 3 stripes sign and also click on help option with (?) mark.
- Now click on “Troubleshooting Information” from the given list.

- Within the upper right corner of the next window you can find “Refresh Firefox” button, click on it.
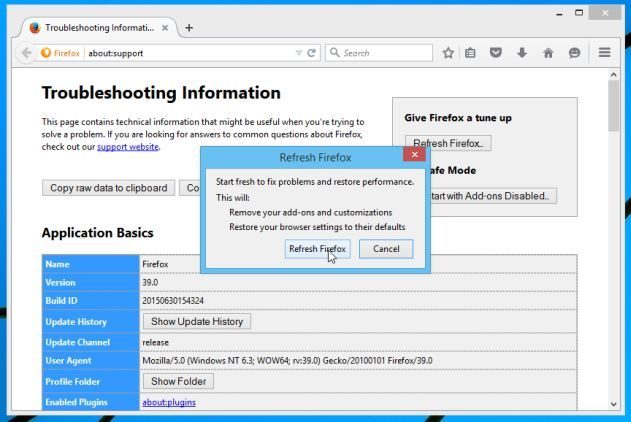
- To reset your Mozilla Firefox browser simply click on “Refresh Firefox” button again, after which all unwanted changes made by Smart DNS Proxy will be removed automatically.
Steps to Reset Internet Explorer to Get Rid of Smart DNS Proxy
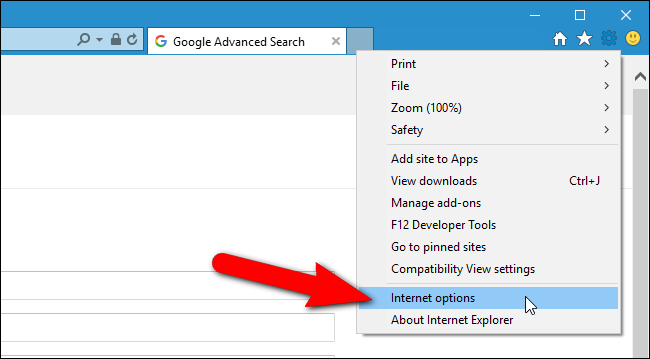
- You need to close all Internet Explorer windows which are currently working or open.
- Now open Internet Explorer again and click on Tools button, with wrench icon.
- Go to the menu and click on Internet Options.
- A dialogue box will appear, then click on Advanced tab on it.
- Saying Reset Internet Explorer Settings, click on Reset again.
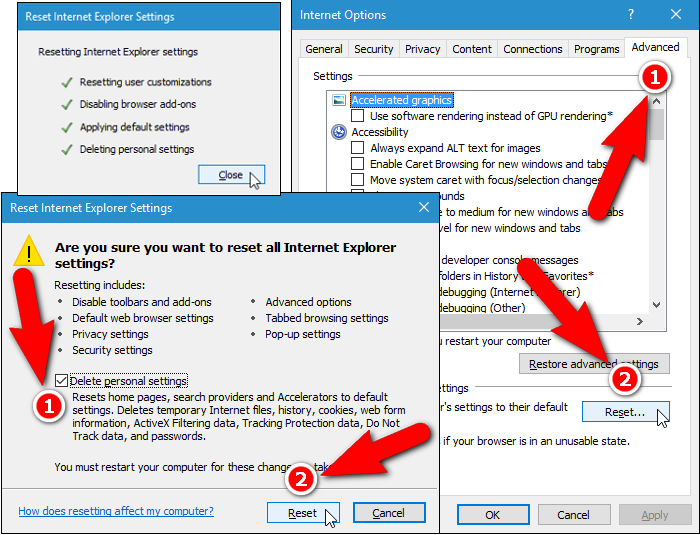
- When IE applied the default settings then, click on Close. And then click OK.
Restart the PC is a must for taking effect on all the changes you have made.
Step:3 How to Protect your PC from Smart DNS Proxy in Near Future
Steps to Turn On Safe Browsing Features
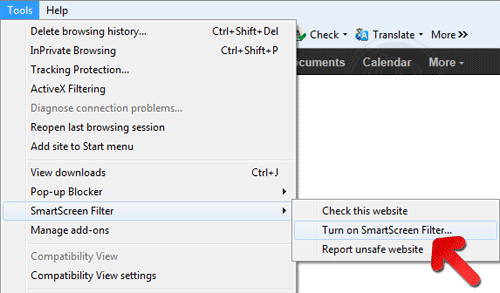
Internet Explorer: Activate SmartScreen Filter against Smart DNS Proxy
- This can be done on IE Versions 8 and 9. It mailnly helps in detecting Smart DNS Proxy while browsing
- Launch IE
- Choose Tools in IE 9. If you are using IE 8, Find Safety option in Menu
- Now Select SmartScreen Filter and opt for Turn on SmartScreen Filter
- Once done, Restart IE
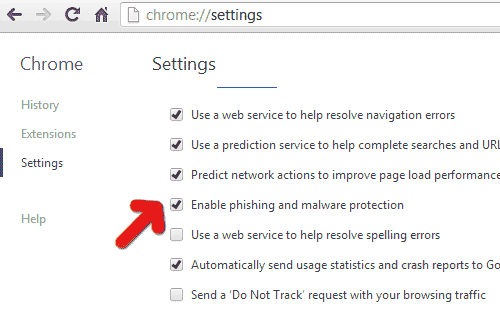
How to Enable Phishing and Smart DNS Proxy Protection on Google Chrome
- Click on Google Chrome browser
- Select Customize and Control Google Chrome (3-Bar Icon)
- Now Choose Settings from the option
- In the Settings Option, Click on Show advanced Settings which can be found at the bottom of the Setup
- Select Privacy Section and click on Enable Phishing and Malware Protection
- Now Restart Chrome, this will keep your browser safe from Smart DNS Proxy
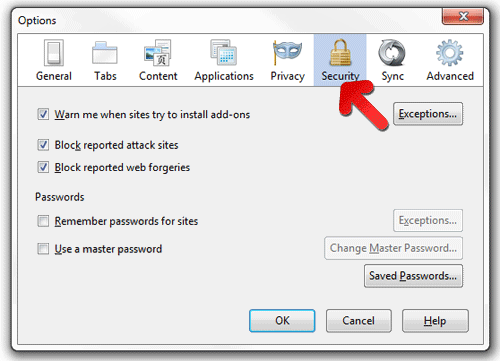
How to Block Smart DNS Proxy Attack and Web Forgeries
- Click to Load Mozilla Firefox
- Press on Tools on Top Menu and Select options
- Choose Security and enable check mark on following
- warn me when some site installs add-ons
- Block reported Web forgeries
- Block reported attack Sites
If still Smart DNS Proxy exists on your system, Scan your PC to detect and Get Rid of it

Kindly submit your question, incase if you wish to know more about Smart DNS Proxy Removal

