| 14WqqoWch8bDkFYUtxP96qUgyEQxDZhsoZ is a Spyware | |
| Trojan Dropped by 14WqqoWch8bDkFYUtxP96qUgyEQxDZhsoZ are Trojan.Win32.Agent2.cdb, Lily Jade, Infostealer.Banker.E, Trojan.Darkshell, Ada, Trojan.MBRlock, Satiloler, Inker.B, Trojan.Boupke.gen!A, Rots, IRC-Worm.Simona | |
| Related spyware Teensearch Bar, Backdoor.Turkojan!ct, SpyDefender Pro, SpyDestroy Pro, MalWarrior, NetZip, Immunizr, Ydky9kv.exe, Heoms, Worm.Ahkarun.A, PC-Prot | |
| Windows Error caused by 14WqqoWch8bDkFYUtxP96qUgyEQxDZhsoZ are – 0x8024400C WU_E_PT_SOAP_MUST_UNDERSTAND Same as SOAP_E_MUST_UNDERSTAND – SOAP client was unable to understand a header., 0x00000073, 0x80244029 WU_E_PT_INVALID_CONFIG_PROP A configuration property value was wrong., 0xf0801 CBS_S_BUSY operation is still in progress, 0x0000006C, 0x00000057, 0xf0820 CBS_E_CANCEL user cancel, IDCANCEL returned by ICbsUIHandler method except Error(), Error 0x80240031, 0x00000042, 0x00000082 | |
| 14WqqoWch8bDkFYUtxP96qUgyEQxDZhsoZ infects these windows .dll files rgb9rast.dll, SensorsCpl.dll, BrSerIf.dll, System.Web.RegularExpressions.dll, hpzurw71.dll, smtpadm.dll, wmpasf.dll, PeerDistSh.dll, Microsoft.Web.Management.FtpClient.resources.dll, docprop2.dll |
14WqqoWch8bDkFYUtxP96qUgyEQxDZhsoZ may have entered your pc through these software. If you have not installed them , then get rid of them Barcody 3.02 , Viscosity v1.4.8 , Battle for Wesnoth 1.5 , ThinkFree Viewer Widget 1.1 , The 70s Visualization Tunnel Edition 1.0 , Lines 1.3.2 , BookReader 4.15 , DTerm 3.2 , iJoysoft iPod Transfer Platinum , RedPill 1.5.0 , PDF Assistant 1.4 , USB Mass Storage Support 1.3.5 , Bing 1.2.1 , Get Backup 2.6 , Learning Cocoa 1.0 , VPNConnect 1.0.4 , Sybase Tool 2.0.2 , Amazing Adventures: The Forgotten Dynasty 1.0 |
|


Remove 14WqqoWch8bDkFYUtxP96qUgyEQxDZhsoZ From PC In The Best Effective Way
When I was downloading updates for a software at the same time my PC got infected with a virus 14WqqoWch8bDkFYUtxP96qUgyEQxDZhsoZ. I was informed about its presence in the system through my antivirus program. I tried each and every removal methods which were enough to remove a malware from my system but the 14WqqoWch8bDkFYUtxP96qUgyEQxDZhsoZ is so adamant that it is still existing in my system and creating problems for me to work properly on my PC. Anyone kindly suggest me the way to remove it from my PC as your help in any way will be highly appreciated.
Summary Of The Threat
| Name | 14WqqoWch8bDkFYUtxP96qUgyEQxDZhsoZ |
| Type | Trojan |
| Danger | High |
| Symptoms | Make your system work slow, generate fake alerts, pop-ups add and many more |
| Distribution Channel | Spam email messages, bundling method |
| Detection | Download Free Scanner can detect 14WqqoWch8bDkFYUtxP96qUgyEQxDZhsoZ |
How 14WqqoWch8bDkFYUtxP96qUgyEQxDZhsoZ Invades Your System?
14WqqoWch8bDkFYUtxP96qUgyEQxDZhsoZ can invade your system in numerous ways which includes spam email attachments, bundling with certain free software available online, through some suspected websites and download links, peer-to-peer sharing of data over networks and there can be some others too which can be used to intrude by 14WqqoWch8bDkFYUtxP96qUgyEQxDZhsoZ in your PC.
The most common method for invasion 14WqqoWch8bDkFYUtxP96qUgyEQxDZhsoZ uses is spam email message because these are smart enough to trick user in downloading the attachments associated to it. These attachments attached to the spam emails are the best carrier of the virus like 14WqqoWch8bDkFYUtxP96qUgyEQxDZhsoZ. 14WqqoWch8bDkFYUtxP96qUgyEQxDZhsoZ infiltrates inside your PC immediately after you download the attachment to the spam email without consenting you.
What Does 14WqqoWch8bDkFYUtxP96qUgyEQxDZhsoZ Do In Your PC?
As 14WqqoWch8bDkFYUtxP96qUgyEQxDZhsoZ infiltrates in your PC, first of all it penetrate deep inside your PC so that it would be difficult for the user to trace its location. Thereafter it feeds some new entries in your Windows Registry Editor and may alter the available registry entries. 14WqqoWch8bDkFYUtxP96qUgyEQxDZhsoZ invokes these entries to initiate itself automatically each time when the system is started. It may also download some junk files into your system which can lead to increase the utilization of the CPU and hence can result in causing your system to hang and in some cases it may result in collapsing of system.
14WqqoWch8bDkFYUtxP96qUgyEQxDZhsoZ also drops certain other malicious code into your computer which makes your compromised PC more feeble than before. As it has association with some adware and browser hijackers therefore it may hijack your browser settings and some crucial system settings and can also redirect you to some sites which can inject numbers of malware inside your PC.
How To Remove 14WqqoWch8bDkFYUtxP96qUgyEQxDZhsoZ From Your PC?
If your antivirus program is unable to detect the location of 14WqqoWch8bDkFYUtxP96qUgyEQxDZhsoZ inside your PC then you should download Free Download Scanner to detect for its location. Once it is detected immediately remove it and reboot your system.
Manual 14WqqoWch8bDkFYUtxP96qUgyEQxDZhsoZ Removal Guide
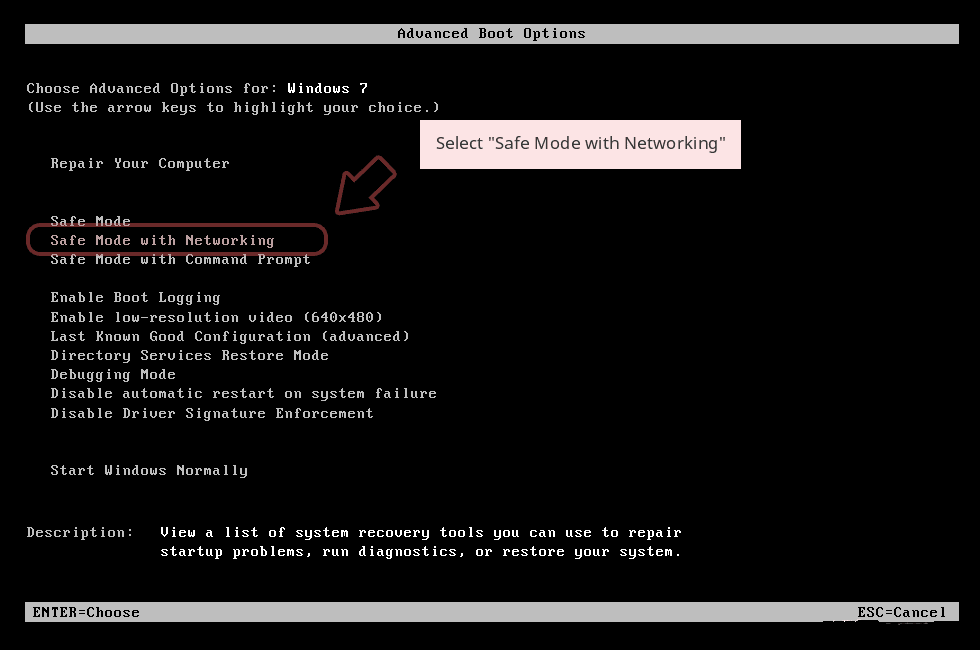
Step 1: How to Start your PC in Safe Mode with Networking to Get Rid of 14WqqoWch8bDkFYUtxP96qUgyEQxDZhsoZ
(For Win 7 | XP | Vista Users)
- first of all PC is to be rebooted in Safe Mode with Networking
- Select on Start Button and Click on Shutdown | Restart option and select OK
- when the PC restarts, keep tapping on F8 until you don’t get Advanced Boot Options.
- Safe Mode with Networking Option is to be selected from the list.
(For Win 8 | 8.1 | Win 10 Users)
- Click on Power Button near Windows Login Screen
- Keep Shift Button on the keyboard pressed and select Restart Option
- Now Select on Enable Safe Mode with Networking Option

In case 14WqqoWch8bDkFYUtxP96qUgyEQxDZhsoZ, is not letting your PC to Start in Safe Mode, then following Step is to followed
Step 2: Remove 14WqqoWch8bDkFYUtxP96qUgyEQxDZhsoZ Using System Restore Process
- PC need to be rebooted to Safe Mode with Command Prompt
- As soon as Command Prompt Window appear on the screen, select on cd restore and press on Enter option
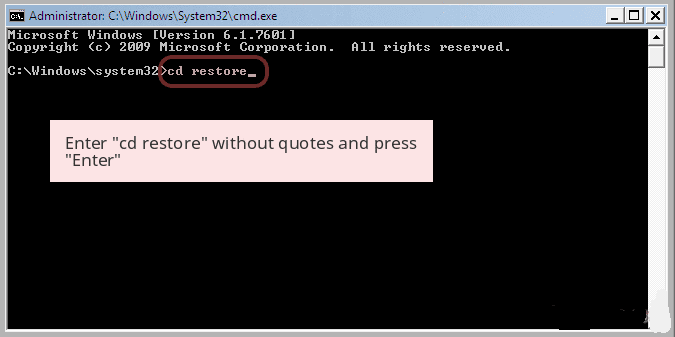
Type rstrui.exe and Click on Enter again.

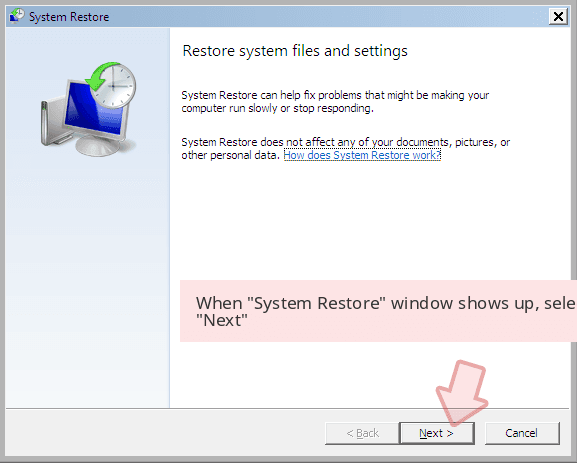
Now users need to Click on Next option and Choose restore point that was the last time Windows was working fine prior to 14WqqoWch8bDkFYUtxP96qUgyEQxDZhsoZ infection. Once done, Click on Next button.
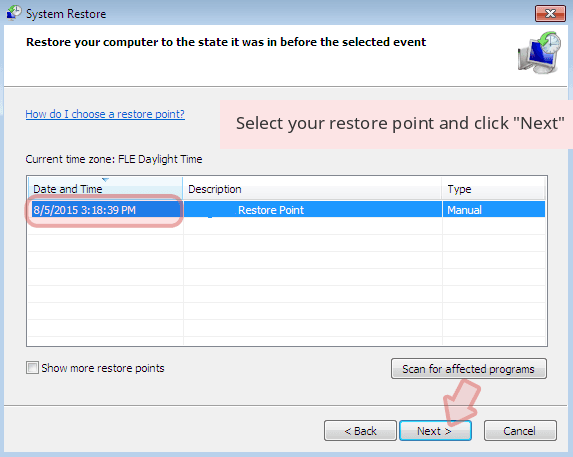
Select Yes to Restore your System and get rid of 14WqqoWch8bDkFYUtxP96qUgyEQxDZhsoZ infection.

However, if the above steps does not work to remove 14WqqoWch8bDkFYUtxP96qUgyEQxDZhsoZ, follow the below mentioned steps
Step:3 Unhide All Hidden Files and Folders to Delete 14WqqoWch8bDkFYUtxP96qUgyEQxDZhsoZ
How to View 14WqqoWch8bDkFYUtxP96qUgyEQxDZhsoZ Hidden Folders on Windows XP
- In order to show the hidden files and folders, you need to follow the given instructions:-
- Close all the Windows or minimize the opened application to go to desktop.
- Open “My Computer” by double-clicking on its icon.
- Click on Tools menu and select Folder options.
- Click on the View tab from the new Window.
- Check the Display contents of the system folders options.
- In the Hidden files and folders section, you need to put a check mark on Show hidden files and folders option.
- Click on Apply and then OK button. Now, close the Window.
- Now, you can see all the 14WqqoWch8bDkFYUtxP96qUgyEQxDZhsoZ related hidden files and folders on the system.

How to Access 14WqqoWch8bDkFYUtxP96qUgyEQxDZhsoZ Hidden folders on Windows Vista
- Minimize or close all opened tabs and go to Desktop.
- Go to the lower left of your screen, you will see Windows logo there, click on Start button.
- Go to Control Panel menu and click on it.
- After Control Panel got opened, there will two options, either “Classic View” or “Control Panel Home View”.
- Do the following when you are in “Classic View”.
- Double click on the icon and open Folder Options.
- Choose View tab.
- Again move to step 5.
- Do the following if you are “Control Panel Home View”.
- Hit button on Appearance and Personalization link.
- Chose Show Hidden Files or Folders.
- Under the Hidden File or Folder section, click on the button which is right next to the Show Hidden Files or Folders.
- Click on Apply button and then hit OK. Now, close the window.
- Now, to show you all hidden files or folders created by 14WqqoWch8bDkFYUtxP96qUgyEQxDZhsoZ, you have successfully considered Windows Vista.

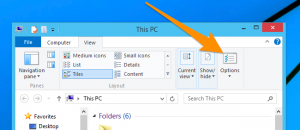
How to Unhide 14WqqoWch8bDkFYUtxP96qUgyEQxDZhsoZ Created Folders on Windows 7
1. Go to the desktop and tap on the small rectangle which is located in the lower-right part of the system screen.
2. Now, just open the “Start” menu by clicking on the Windows start button which is located in the lower-left side of the PC screen that carries the windows logo.
3. Then after, look for the “Control Panel” menu option in the right-most row and open it.
4. When the Control Panel menu opens, then look for the “Folder Options” link.
5. Tap over the “View tab”.
6. Under the “Advanced Settings” category, double click on the “Hidden Files or Folders” associated with 14WqqoWch8bDkFYUtxP96qUgyEQxDZhsoZ.
7. Next, just select the check-box in order to Show hidden files, folders, or drives.
8. After this, click on “Apply” >> “OK” and then close the menu.
9. Now, the Windows 7 should be configured to show you all hidden files, folders or drives.

Steps to Unhide 14WqqoWch8bDkFYUtxP96qUgyEQxDZhsoZ related Files and Folders on Windows 8
- First of all, power on your Windows PC and click on start logo button that is found in left side of the system screen.
- Now, move to program lists and select control panel app.
- When Control panel is open completely, click on more settings option.
- After, you will see a Control panel Window and then you choose “Appearance and Personalization” tab.
- In Advance settings dialogue box, you need to tick mark on Show hidden files and folders and clear the check box for Hide protected system files.
- Click on Apply and Ok button. This apply option helps you to detect and eradicate all types of 14WqqoWch8bDkFYUtxP96qUgyEQxDZhsoZ related suspicious files.
- Finally, navigate your mouse cursor on close option to exit this panel.
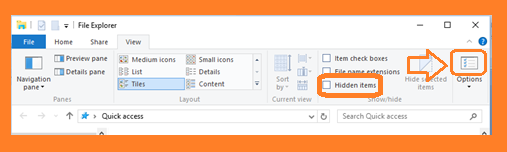
How to View 14WqqoWch8bDkFYUtxP96qUgyEQxDZhsoZ associated folders on Windows 10
1. Open the folder if you wish to unhide files.
2. Search and Click on View in Menu bar
3. In Menu click on to view folder options.
4. Again click on View and Enable Radio Button associated with Show hidden files created by 14WqqoWch8bDkFYUtxP96qUgyEQxDZhsoZ, folder and drive.
5. Press apply and OK.
Step 4: Press Start Key along with R- copy + paste the below stated command and Click on OK
notepad %windir%/system32/Drivers/etc/hosts
- This will open up a new file, in case if your system has been hacked, some IP’s will be shown at the bottom of the screen

Click on the Start Menu, Input “Control Panel” in the search box —> Select. Network and Internet —> Network and Sharing Center —> Next Change Adapter Settings. Right-click your Internet connection —> Select on Properties.
- In case if you find Suspicious IP in the local host –or if you are finding it difficult and have any problem then submit question to us and we will be happy to help you.

Related Posts
 Remove PyXie Trojan from Windows 10 : Take Down PyXie Trojan
- Killua Backdoor Uninstallation: Tutorial To Delete Killua Backdoor In Just Few Steps
- Remove Gon Malware from Windows 7
- EYE Malware Removal: Help To Remove EYE Malware Completely
- Delete CSPY Downloader Manually
- Possible Steps For Deleting Win32/Bundpil from Windows 10