
This post aims to help user by providing an easy and appropriate solution to fix BAD POOL HEADER error in Windows 10. Try the below described solution as in exact order if you are encountering with this error message and your System displays blue screen. All of the instruction are really helpful one.

Know About BAD POOL HEADER Error In Windows 10
Windows 10 is the latest version of Windows Operating System that has enumerated with several highly advanced features. Despites of all excellence features, Windows 10 users might suffer with BAD POOL HEADER or 0x00000019 error code. This type of error message is regarded as one of scary BSOD issue that provide user the creep and force them to think that their PC is at the death’s door. The name of this error message includes Pool which is actually memory pool of Operating System used to allocate the memory and the Header ensures that Windows API is addressed properly or not. The appearances of BAD POOL HEADER error in Windows 10 is an indication that your memory pool are corrupt.
Common Reasons Behind Occurrences of BAD POOL HEADER Error In Windows 10
- Driver issues
- Hardware or Software failure
- Malfunction of RAM
- Conflicts between Computer software
- Virus or malware attack etc.
Effective Tips To Fix BAD POOL HEADER Error In Windows 10
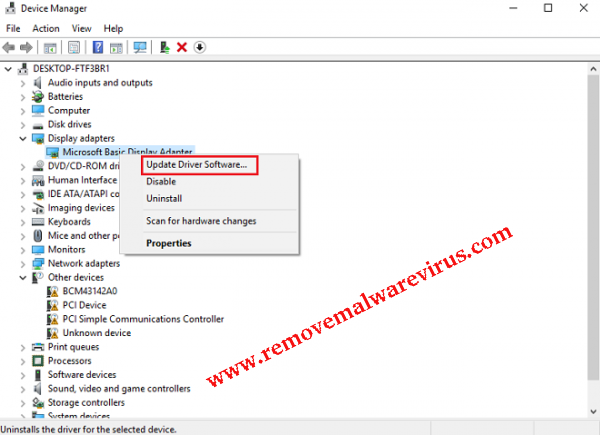
Solution 1 : Update Your Device Driver
-
- Launch Windows 10 OS.
- Go to Start icon and select option of Device Manager.
- Right-click on the driver and select option of Update Driver
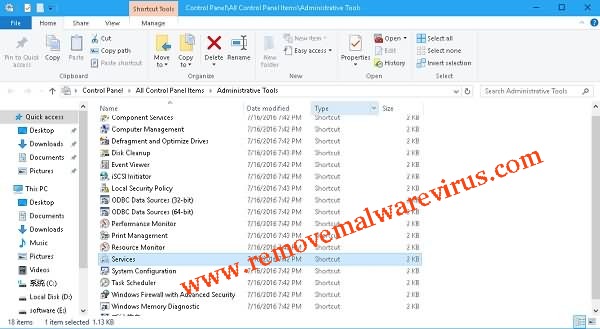
Solution 2 : Disable The Indexing Service To Fix BAD POOL HEADER Error In Windows 10
-
- Launch Control Panel on your Windows 10 OS.
- Choose option of ‘All Control Panel Items’ and then click on Administrative Tools.
- After that choose Services option.
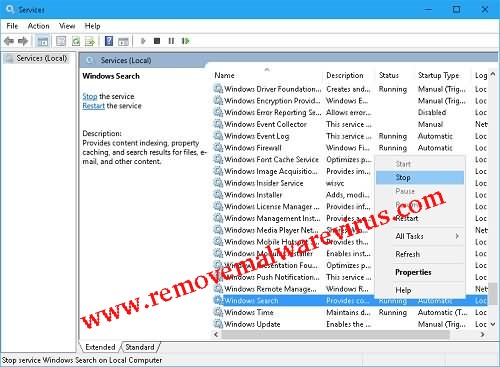
- On next, locate Indexing or Windows Service from list.
-
- Right-click on the Indexing Service/Windows Search and then after click on Stop button.
-
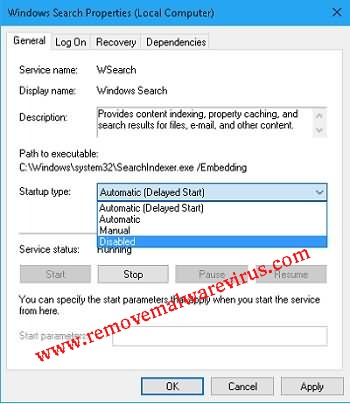
- On the windows of ‘Windows Search Properties’, choose Disabled option in Startup type and then restart your Windows 10 PC to save all the modifications.
Solution 3 : Check Where Your RAM Is Working or Not
-
- Start your Windows 10 PC.
- Move your cursor to Start icon.
- In the opened search box, input Memory Diagnostics Tool.
- On next, right-click on the Memory Diagnostics Tool and then after select option of ‘Run as Administrator’.
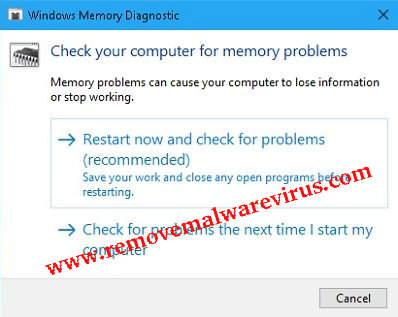
- After that follow the step by step instruction to initiate diagnostic process to fix BAD POOL HEADER error in Windows 10.
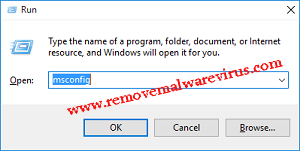
Solution 4 : Perform Clean Boot On Windows 10
-
- Launch the dialog of System Configuration.
- It can be done by pressing Win+R key and inputing msconfig followed by OK button.
-
- Go to General tab, disable the startup programs and uncheck the load startup items.
- On next, go to the Services tab, tick on ‘Hide all Microsoft service’ and then after click on Disable All button.
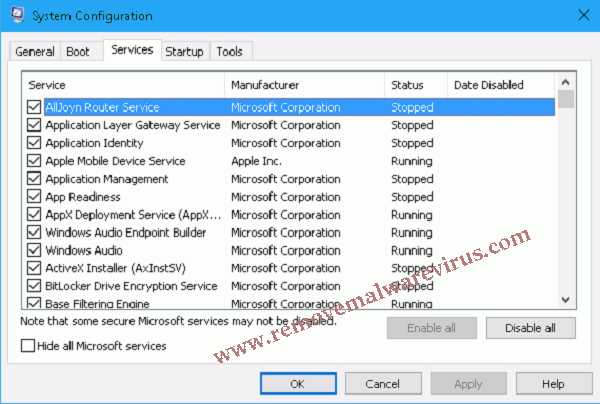
- At last, restart your PC.
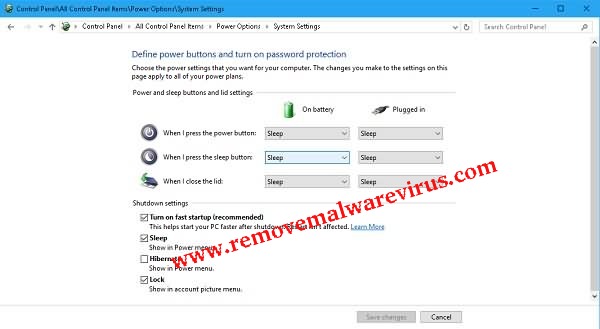
Solution 5 : Disable The Option of Fast Startup To Fix BAD POOL HEADER Error In Windows 10
-
- Right-click on icon of Windows logo.
- Start the Power option.
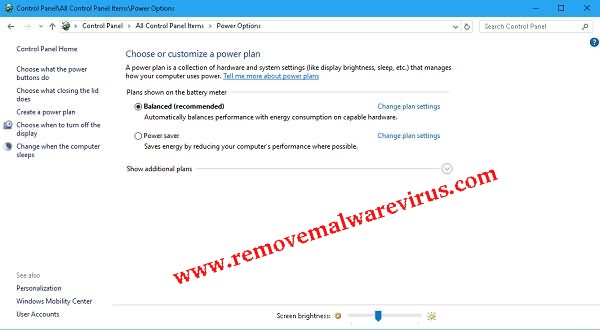
-
- On next, click on ‘Choose what the power button does’ and change the setting.
- Now, uncheck option of Turn on fast startup and then save all changes.
Related Posts
 New AgeLocker Ransomware Abuses Legit ‘Age’ Encryption Tool
 Five Ways to Check If a Website Is Safe?
 Resolve The Recycle Bin on C:/ is corrupted Error on Windows 10
 (Resolved) Headphones Not Working In Windows 10
 Best Method To Fix The Javaw.exe Error On Windows
 (Resolved) 0X000000A5 Blue Screen Stop Error on Windows