| Xerox Scanned Document Email Scam is a Spyware | |
| Trojan Dropped by Xerox Scanned Document Email Scam are Iflar.gen!B, Trojan.Ransom.HX, Slenping.AD, Troj/BredoZp-KP, Trojan.Agent.KY, PWSteal.Zbot.gen!AK, Looksky.g, Acoragil, RegKill Trojan, Virus.Binder, Virus.VBInject.WE | |
| Related spyware PCPrivacyTool, SafePCTool, MessengerPlus, Egodktf Toolbar, Adware.BitLocker, Adware.BHO.BluSwede, BugsDestroyer, PhP Nawai 1.1, VirusEraser, Trojan – Win32/Qoologic, Worm.Socks.aa | |
| Windows Error caused by Xerox Scanned Document Email Scam are – 0x0000005D, 0x80242FFF WU_E_UH_UNEXPECTED An update handler error not covered by another WU_E_UH_* code. , 0x0000004B, Error 0x80246007, 0x000000D9, 0x8024001B WU_E_SELFUPDATE_IN_PROGRESS The operation could not be performed because the Windows Update Agent is self-updating., 0x000000DC, 0x80244014 WU_E_PT_INVALID_COMPUTER_LSID Cannot determine computer LSID., 0x8024502D WU_E_PT_SAME_REDIR_ID Windows Update Agent failed to download a redirector cabinet file with a new redirectorId value from the server during the recovery. | |
| Xerox Scanned Document Email Scam infects these windows .dll files validcfg.dll, cryptdlg.dll, kbdusa.dll, w3wphost.dll, iprtprio.dll, mxdwdrv.dll, mpr.dll, qcap.dll, MpEngine.dll, kbduk.dll, wmpcore.dll, usrlbva.dll |
Xerox Scanned Document Email Scam may have entered your pc through these software. If you have not installed them , then get rid of them Space-In-Time 1.5 , mini$ 4.2.1 , ManyCam 3.0.9 , School Time Quizzer X 2.4 , XviD_codec 1.0a , PixPatrol 0.90b , Chinese Queens (PPC) 2.1 , EazyDraw 6.5.0 , Spheremonics 1.0 , Bros DPG Converter , Lighthouse Cams 2.5 , Myary 1.2.1 , VoIP Tracker 1.7 , iDof 3.2 , Web Page Translator 6.0 |
|


Delete Xerox Scanned Document Email Scam Instantly From Windows PC
Get More Knowledge On Xerox Scanned Document Email Scam
Xerox Scanned Document Email Scam is a dangerous Trojan which is especially programmed by the team of notorious criminal hackers in order to steal important information from the victim’s computer. The main purpose of racketeers behind using this malicious software is that they can gain unauthorized access to infected Windows computers and collect confidential data like login details of social media accounts, emails and bank accounts as well. After gaining complete access to user’s machine, the threat actors spies on all actions performed by the users on their system and then Xerox Scanned Document Email Scam will be used to distribute other precarious viruses as well.
How Does Xerox Scanned Document Email Scam Spread & Work?
Technically speaking, the malware mainly infiltrates the targeted Windows computer by using fake software updates, comes attached with download freeware programs and the most dubious which is recognized as spam email attachments. Whenever, the system users click on the files attached in spam folders arrived into their mailbox from unknown sources, then the harmful payload of Xerox Scanned Document Email Scam gets installed immediately and then starts its malicious activities on the compromised computers.
Furthermore, it has the ability to steal saved passwords from popular Internet browsers like Mozilla Firefox, Internet Explorer, Safari, Opera, Mozilla Firefox, MS Edge and others that were installed on the affected computers. Additionally, Xerox Scanned Document Email Scam virus can capture the passwords from several social accounts. The sole intention of con artists is to collect passwords of victim’s online banking accounts and uses it for illegal purposes and cause identity theft as well.
Malicious Symptoms Of Xerox Scanned Document Email Scam
- PC fan automatically starts running extremely fast.
- Installed apps become non-responsive or even crash.
- Usage high CPU resources and degrades system performance.
- Caused BSOD and other errors on infected system screen.
- Xerox Scanned Document Email Scam may corrupt some of the installed programs.
- Download other noxious viruses for illicit purposes.
Since, it is capable of modifying the Windows registry entries, the threat can start each and every system reboot to perform various harmful tasks. Therefore, security analysts at RMV strongly advise you to take immediate action for Xerox Scanned Document Email Scam removal, because the longer it will stay, the more consequences it may cause.
Manual Xerox Scanned Document Email Scam Removal Guide
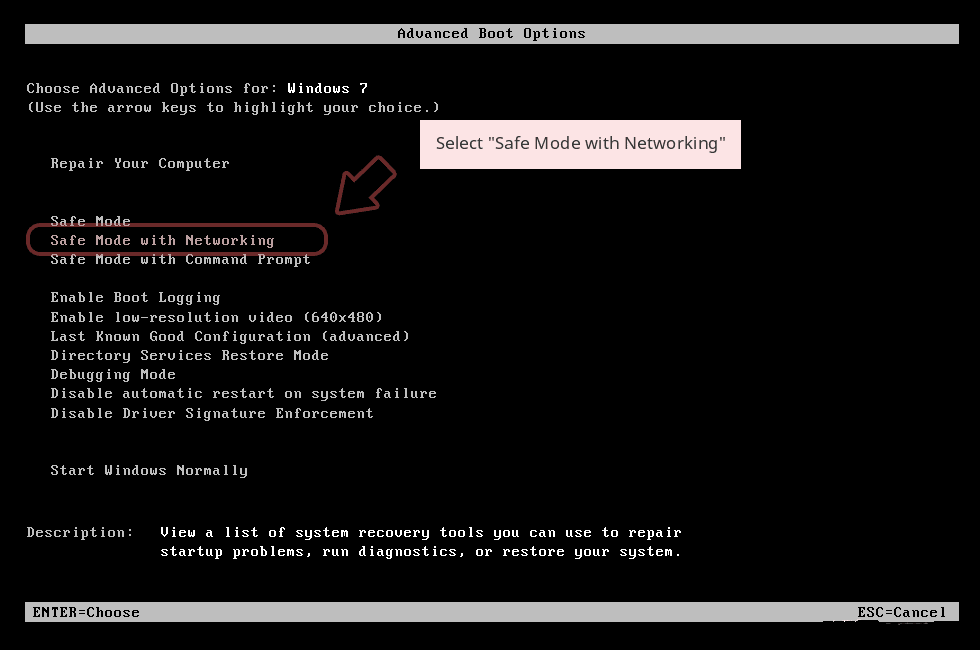
Step 1: How to Start your PC in Safe Mode with Networking to Get Rid of Xerox Scanned Document Email Scam
(For Win 7 | XP | Vista Users)
- first of all PC is to be rebooted in Safe Mode with Networking
- Select on Start Button and Click on Shutdown | Restart option and select OK
- when the PC restarts, keep tapping on F8 until you don’t get Advanced Boot Options.
- Safe Mode with Networking Option is to be selected from the list.
(For Win 8 | 8.1 | Win 10 Users)
- Click on Power Button near Windows Login Screen
- Keep Shift Button on the keyboard pressed and select Restart Option
- Now Select on Enable Safe Mode with Networking Option

In case Xerox Scanned Document Email Scam, is not letting your PC to Start in Safe Mode, then following Step is to followed
Step 2: Remove Xerox Scanned Document Email Scam Using System Restore Process
- PC need to be rebooted to Safe Mode with Command Prompt
- As soon as Command Prompt Window appear on the screen, select on cd restore and press on Enter option
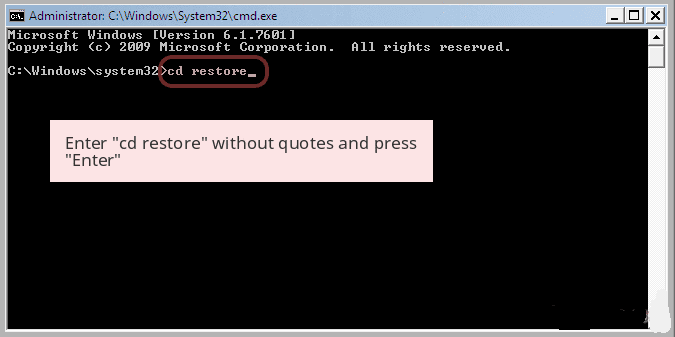
Type rstrui.exe and Click on Enter again.

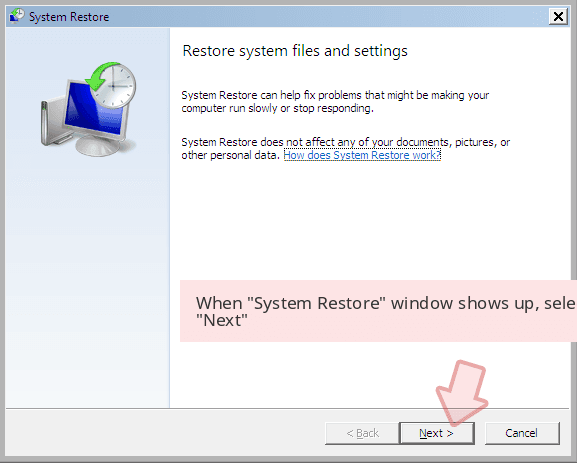
Now users need to Click on Next option and Choose restore point that was the last time Windows was working fine prior to Xerox Scanned Document Email Scam infection. Once done, Click on Next button.
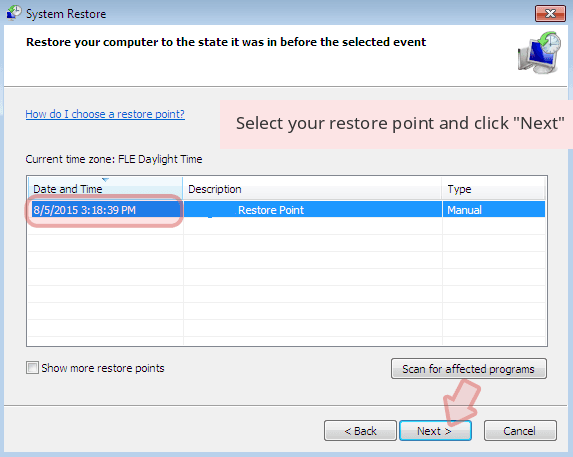
Select Yes to Restore your System and get rid of Xerox Scanned Document Email Scam infection.

However, if the above steps does not work to remove Xerox Scanned Document Email Scam, follow the below mentioned steps
Step:3 Unhide All Hidden Files and Folders to Delete Xerox Scanned Document Email Scam
How to View Xerox Scanned Document Email Scam Hidden Folders on Windows XP
- In order to show the hidden files and folders, you need to follow the given instructions:-
- Close all the Windows or minimize the opened application to go to desktop.
- Open “My Computer” by double-clicking on its icon.
- Click on Tools menu and select Folder options.
- Click on the View tab from the new Window.
- Check the Display contents of the system folders options.
- In the Hidden files and folders section, you need to put a check mark on Show hidden files and folders option.
- Click on Apply and then OK button. Now, close the Window.
- Now, you can see all the Xerox Scanned Document Email Scam related hidden files and folders on the system.

How to Access Xerox Scanned Document Email Scam Hidden folders on Windows Vista
- Minimize or close all opened tabs and go to Desktop.
- Go to the lower left of your screen, you will see Windows logo there, click on Start button.
- Go to Control Panel menu and click on it.
- After Control Panel got opened, there will two options, either “Classic View” or “Control Panel Home View”.
- Do the following when you are in “Classic View”.
- Double click on the icon and open Folder Options.
- Choose View tab.
- Again move to step 5.
- Do the following if you are “Control Panel Home View”.
- Hit button on Appearance and Personalization link.
- Chose Show Hidden Files or Folders.
- Under the Hidden File or Folder section, click on the button which is right next to the Show Hidden Files or Folders.
- Click on Apply button and then hit OK. Now, close the window.
- Now, to show you all hidden files or folders created by Xerox Scanned Document Email Scam, you have successfully considered Windows Vista.

How to Unhide Xerox Scanned Document Email Scam Created Folders on Windows 7
1. Go to the desktop and tap on the small rectangle which is located in the lower-right part of the system screen.
2. Now, just open the “Start” menu by clicking on the Windows start button which is located in the lower-left side of the PC screen that carries the windows logo.
3. Then after, look for the “Control Panel” menu option in the right-most row and open it.
4. When the Control Panel menu opens, then look for the “Folder Options” link.
5. Tap over the “View tab”.
6. Under the “Advanced Settings” category, double click on the “Hidden Files or Folders” associated with Xerox Scanned Document Email Scam.
7. Next, just select the check-box in order to Show hidden files, folders, or drives.
8. After this, click on “Apply” >> “OK” and then close the menu.
9. Now, the Windows 7 should be configured to show you all hidden files, folders or drives.

Steps to Unhide Xerox Scanned Document Email Scam related Files and Folders on Windows 8
- First of all, power on your Windows PC and click on start logo button that is found in left side of the system screen.
- Now, move to program lists and select control panel app.
- When Control panel is open completely, click on more settings option.
- After, you will see a Control panel Window and then you choose “Appearance and Personalization” tab.
- In Advance settings dialogue box, you need to tick mark on Show hidden files and folders and clear the check box for Hide protected system files.
- Click on Apply and Ok button. This apply option helps you to detect and eradicate all types of Xerox Scanned Document Email Scam related suspicious files.
- Finally, navigate your mouse cursor on close option to exit this panel.
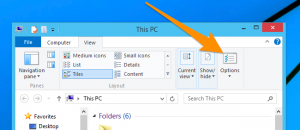
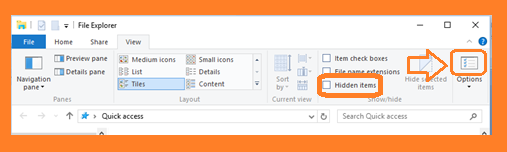
How to View Xerox Scanned Document Email Scam associated folders on Windows 10
1. Open the folder if you wish to unhide files.
2. Search and Click on View in Menu bar
3. In Menu click on to view folder options.
4. Again click on View and Enable Radio Button associated with Show hidden files created by Xerox Scanned Document Email Scam, folder and drive.
5. Press apply and OK.
Step 4: Press Start Key along with R- copy + paste the below stated command and Click on OK
notepad %windir%/system32/Drivers/etc/hosts
- This will open up a new file, in case if your system has been hacked, some IP’s will be shown at the bottom of the screen

Click on the Start Menu, Input “Control Panel” in the search box —> Select. Network and Internet —> Network and Sharing Center —> Next Change Adapter Settings. Right-click your Internet connection —> Select on Properties.
- In case if you find Suspicious IP in the local host –or if you are finding it difficult and have any problem then submit question to us and we will be happy to help you.

Related Posts
 Remove PyXie Trojan from Windows 10 : Take Down PyXie Trojan
- Killua Backdoor Uninstallation: Tutorial To Delete Killua Backdoor In Just Few Steps
- Remove Gon Malware from Windows 7
- EYE Malware Removal: Help To Remove EYE Malware Completely
- Delete CSPY Downloader Manually
- Possible Steps For Deleting Win32/Bundpil from Windows 10