| 13EB15QkdBpvakv1MZdG1cLdDhy7sP5heJ is a Backdoor | |
| Trojan Dropped by 13EB15QkdBpvakv1MZdG1cLdDhy7sP5heJ are TROJ_FAKEAV.FNZ, Virus.Injector.AR, KheSahn, Virus.CeeInject.gen!GT, Trojan-downloader:java/agent.dtag, Autorun.CZ, Trojan.FakeAV.rfz, Sleepe Trojan, JS:Banker-IC, Autorun.AT | |
| Related spyware DriveDefender, Adware.BHO.je, Not-a-virus:Server-FTP.Win32.Serv-U.gmh, 4Arcade, XP Cleaner, HSLAB Logger, Ashlt, DisqudurProtection, Softhomesite.com | |
| Windows Error caused by 13EB15QkdBpvakv1MZdG1cLdDhy7sP5heJ are – 0x8024800A WU_E_DS_UNKNOWNHANDLER The update was not processed because its update handler could not be recognized., 0x80244023 WU_E_PT_HTTP_STATUS_GATEWAY_TIMEOUT Same as HTTP status 503 – the request was timed out waiting for a gateway., Error 0xC1900208 – 1047526904, 0x80249005 WU_E_INVENTORY_WMI_ERROR A WMI error occurred when enumerating the instances for a particular class., 0x00000093, Error 0x800F0922, 0x80246003 WU_E_DM_UNKNOWNALGORITHM A download manager operation could not be completed because the file metadata requested an unrecognized hash algorithm., 0x1000007F | |
| 13EB15QkdBpvakv1MZdG1cLdDhy7sP5heJ infects these windows .dll files System.Windows.Forms.ni.dll, cimwin32.dll, BrmfLpt.dll, mcicda.dll, kbdcan.dll, api-ms-win-core-handle-l1-1-0.dll, wmdmlog.dll, Microsoft.Web.Management.Ftp.resources.dll, msshsq.dll, wininet.dll, wmcoinst.dll, kbdhe220.dll, kbdlt1.dll, avtapi.dll |
13EB15QkdBpvakv1MZdG1cLdDhy7sP5heJ may have entered your pc through these software. If you have not installed them , then get rid of them PCV Theory Test Lite 3.0.1 , EnergyRB 1.0 , Splode 1.03 , Scene Detector 2.6 , Solar Walk 2.0.2 , XmasBotz Screensaver 1.5 , iShout 1.0.1 , MAMP PRO 3.0.6 , Magic Charts X 2.7b2 , DH_Reincarnation 2.1 , rekall 2.3.4 , Facebook Notifier 1.0 , Wibiki 1.0 , History 2.3 , Vuze 5.6.0.0 , Toast Titanium , Wrap|Unwrap Plug-in 1.0 , Bommo Sweeper 1.1 |
|


Eradicate 13EB15QkdBpvakv1MZdG1cLdDhy7sP5heJ Virus Infection Completely
Got 13EB15QkdBpvakv1MZdG1cLdDhy7sP5heJ on your PC? Unable to delete the virus from your computer? Is your PC very slow after its arrival? Looking for easy method to delete the virus infection? Read the article and follow the steps mentioned below here to permanently get rid of the malware.
13EB15QkdBpvakv1MZdG1cLdDhy7sP5heJ is a heuristic computer virus infection. It is such brutal computer infection that gets into your computer system without asking your permission. This type of threats is able to infect all the versions even latest version of the Windows operating system. The presence of this nasty virus is the reason behind all the unusual things and severe issues on your system. On arriving successfully on the targeted PC, its first job is to replicate its files and hides them under system files. As a result, it is bit cumbersome to detect the actual location of its main file and them to remove its permanently from PC. Trojan virus keeps changing its location time to time. Being hideous in nature, even the security programs like firewall and Windows Defender are not able to detect its presence easily. Even if anti-virus program alerts you about its existence, it will not be to remove them properly.
This is so because 13EB15QkdBpvakv1MZdG1cLdDhy7sP5heJ on entering your PC at first disables all the security applications installed on the system. And so it fails to remove the malware efficiently. A trojan virus creates too much of damage and annoyances inside the targeted system. The only motive of the trojan virus is to perform various malicious activities once it arrive son the targeted PC. The virus infection deeply roots inside and makes several unwanted changes. It makes changes in the DNS settings, configuration settings and registry entry. It then creates loopholes and irrelevant path for cyber spooks to invasde the system silently.
The advance technique is used by 13EB15QkdBpvakv1MZdG1cLdDhy7sP5heJ in order to eat up huge system resources such as CPU and occupy all the memory space which makes system processes very slow. Execution of lots of malicious processes and tasks slow down the running speed of the compromised PC. The creepy threat may sometimes generate fake warning messages and alerts. It is able responsible for installing various malevolent codes into the computer. So you must remove 13EB15QkdBpvakv1MZdG1cLdDhy7sP5heJ using an effective removal guide or a removal tool.
Manual 13EB15QkdBpvakv1MZdG1cLdDhy7sP5heJ Removal Guide
Step 1: How to Start your PC in Safe Mode with Networking to Get Rid of 13EB15QkdBpvakv1MZdG1cLdDhy7sP5heJ
(For Win 7 | XP | Vista Users)
- first of all PC is to be rebooted in Safe Mode with Networking
- Select on Start Button and Click on Shutdown | Restart option and select OK
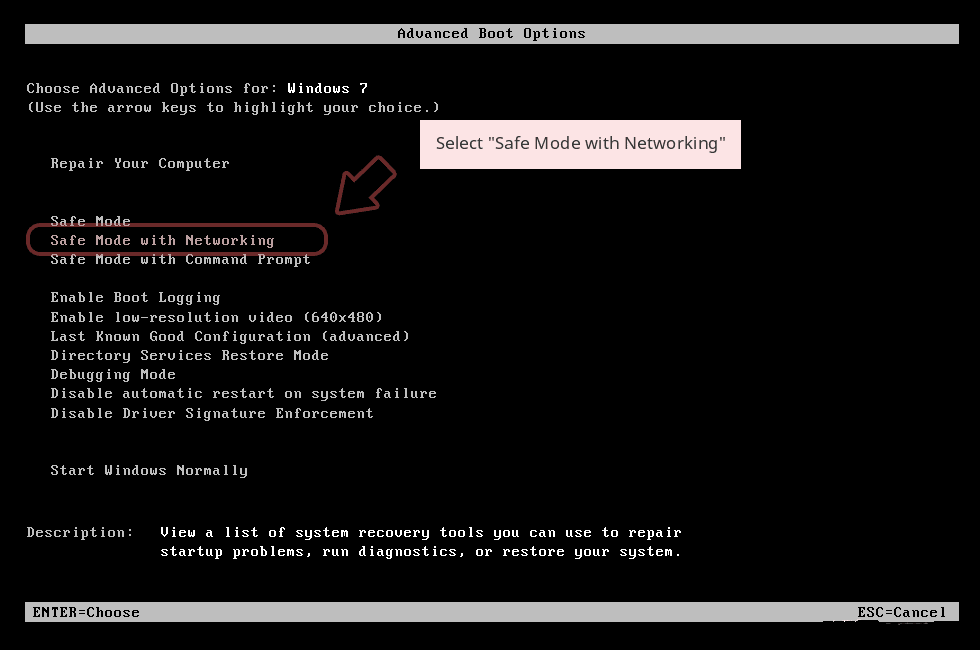
- when the PC restarts, keep tapping on F8 until you don’t get Advanced Boot Options.
- Safe Mode with Networking Option is to be selected from the list.
(For Win 8 | 8.1 | Win 10 Users)
- Click on Power Button near Windows Login Screen
- Keep Shift Button on the keyboard pressed and select Restart Option
- Now Select on Enable Safe Mode with Networking Option

In case 13EB15QkdBpvakv1MZdG1cLdDhy7sP5heJ, is not letting your PC to Start in Safe Mode, then following Step is to followed
Step 2: Remove 13EB15QkdBpvakv1MZdG1cLdDhy7sP5heJ Using System Restore Process
- PC need to be rebooted to Safe Mode with Command Prompt
- As soon as Command Prompt Window appear on the screen, select on cd restore and press on Enter option
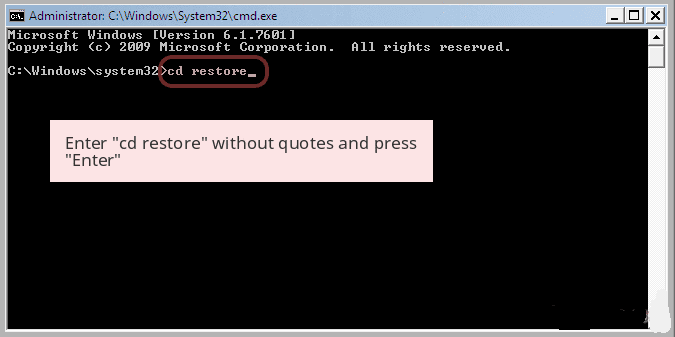
Type rstrui.exe and Click on Enter again.

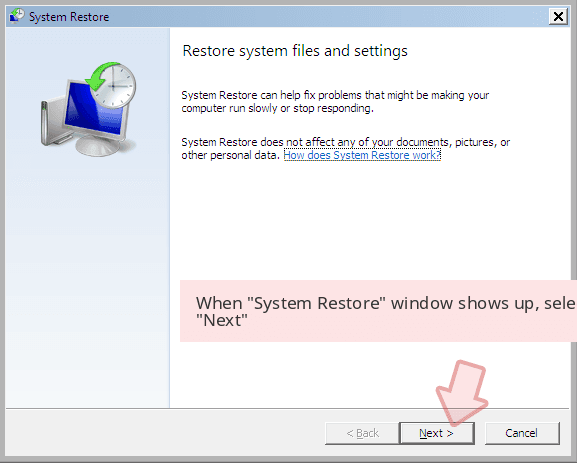
Now users need to Click on Next option and Choose restore point that was the last time Windows was working fine prior to 13EB15QkdBpvakv1MZdG1cLdDhy7sP5heJ infection. Once done, Click on Next button.
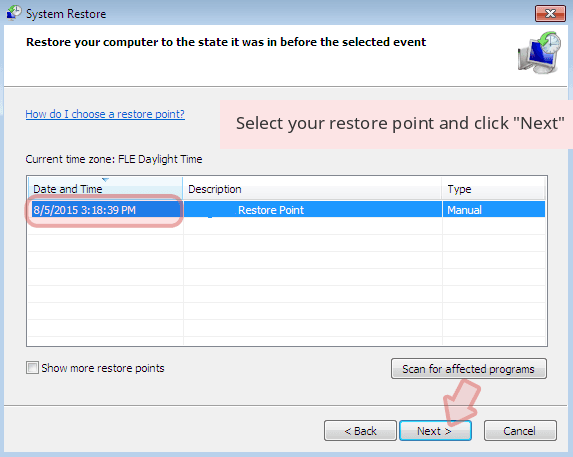
Select Yes to Restore your System and get rid of 13EB15QkdBpvakv1MZdG1cLdDhy7sP5heJ infection.

However, if the above steps does not work to remove 13EB15QkdBpvakv1MZdG1cLdDhy7sP5heJ, follow the below mentioned steps
Step:3 Unhide All Hidden Files and Folders to Delete 13EB15QkdBpvakv1MZdG1cLdDhy7sP5heJ
How to View 13EB15QkdBpvakv1MZdG1cLdDhy7sP5heJ Hidden Folders on Windows XP
- In order to show the hidden files and folders, you need to follow the given instructions:-
- Close all the Windows or minimize the opened application to go to desktop.
- Open “My Computer” by double-clicking on its icon.
- Click on Tools menu and select Folder options.
- Click on the View tab from the new Window.
- Check the Display contents of the system folders options.
- In the Hidden files and folders section, you need to put a check mark on Show hidden files and folders option.
- Click on Apply and then OK button. Now, close the Window.
- Now, you can see all the 13EB15QkdBpvakv1MZdG1cLdDhy7sP5heJ related hidden files and folders on the system.

How to Access 13EB15QkdBpvakv1MZdG1cLdDhy7sP5heJ Hidden folders on Windows Vista
- Minimize or close all opened tabs and go to Desktop.
- Go to the lower left of your screen, you will see Windows logo there, click on Start button.
- Go to Control Panel menu and click on it.
- After Control Panel got opened, there will two options, either “Classic View” or “Control Panel Home View”.
- Do the following when you are in “Classic View”.
- Double click on the icon and open Folder Options.
- Choose View tab.
- Again move to step 5.
- Do the following if you are “Control Panel Home View”.
- Hit button on Appearance and Personalization link.
- Chose Show Hidden Files or Folders.
- Under the Hidden File or Folder section, click on the button which is right next to the Show Hidden Files or Folders.
- Click on Apply button and then hit OK. Now, close the window.
- Now, to show you all hidden files or folders created by 13EB15QkdBpvakv1MZdG1cLdDhy7sP5heJ, you have successfully considered Windows Vista.

How to Unhide 13EB15QkdBpvakv1MZdG1cLdDhy7sP5heJ Created Folders on Windows 7
1. Go to the desktop and tap on the small rectangle which is located in the lower-right part of the system screen.
2. Now, just open the “Start” menu by clicking on the Windows start button which is located in the lower-left side of the PC screen that carries the windows logo.
3. Then after, look for the “Control Panel” menu option in the right-most row and open it.
4. When the Control Panel menu opens, then look for the “Folder Options” link.
5. Tap over the “View tab”.
6. Under the “Advanced Settings” category, double click on the “Hidden Files or Folders” associated with 13EB15QkdBpvakv1MZdG1cLdDhy7sP5heJ.
7. Next, just select the check-box in order to Show hidden files, folders, or drives.
8. After this, click on “Apply” >> “OK” and then close the menu.
9. Now, the Windows 7 should be configured to show you all hidden files, folders or drives.

Steps to Unhide 13EB15QkdBpvakv1MZdG1cLdDhy7sP5heJ related Files and Folders on Windows 8
- First of all, power on your Windows PC and click on start logo button that is found in left side of the system screen.
- Now, move to program lists and select control panel app.
- When Control panel is open completely, click on more settings option.
- After, you will see a Control panel Window and then you choose “Appearance and Personalization” tab.
- In Advance settings dialogue box, you need to tick mark on Show hidden files and folders and clear the check box for Hide protected system files.
- Click on Apply and Ok button. This apply option helps you to detect and eradicate all types of 13EB15QkdBpvakv1MZdG1cLdDhy7sP5heJ related suspicious files.
- Finally, navigate your mouse cursor on close option to exit this panel.
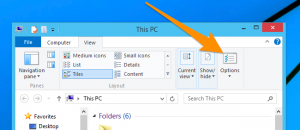
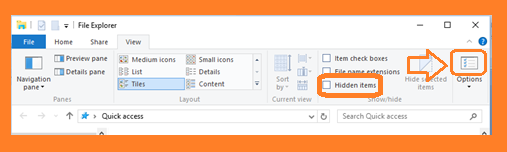
How to View 13EB15QkdBpvakv1MZdG1cLdDhy7sP5heJ associated folders on Windows 10
1. Open the folder if you wish to unhide files.
2. Search and Click on View in Menu bar
3. In Menu click on to view folder options.
4. Again click on View and Enable Radio Button associated with Show hidden files created by 13EB15QkdBpvakv1MZdG1cLdDhy7sP5heJ, folder and drive.
5. Press apply and OK.
Step 4: Press Start Key along with R- copy + paste the below stated command and Click on OK
notepad %windir%/system32/Drivers/etc/hosts
- This will open up a new file, in case if your system has been hacked, some IP’s will be shown at the bottom of the screen

Click on the Start Menu, Input “Control Panel” in the search box —> Select. Network and Internet —> Network and Sharing Center —> Next Change Adapter Settings. Right-click your Internet connection —> Select on Properties.
- In case if you find Suspicious IP in the local host –or if you are finding it difficult and have any problem then submit question to us and we will be happy to help you.

Related Posts
 Remove PyXie Trojan from Windows 10 : Take Down PyXie Trojan
- Killua Backdoor Uninstallation: Tutorial To Delete Killua Backdoor In Just Few Steps
- Remove Gon Malware from Windows 7
- EYE Malware Removal: Help To Remove EYE Malware Completely
- Delete CSPY Downloader Manually
- Possible Steps For Deleting Win32/Bundpil from Windows 10