| 12hBxZ7mzn3LgT3SjCsS6yS4tVefPBWCPt is a Spyware | |
| Trojan Dropped by 12hBxZ7mzn3LgT3SjCsS6yS4tVefPBWCPt are Obfuscator.IP, CeeInject.gen!DI, Trojan:Win32/Danmec.gen!E, MonitoringTool:Win32/TotalSpy, P2P-Worm.Agent.ti, Bamital.H, VBInject.FF, OSX.Lamzev.A, Virus.Obfuscator.YU, VBInject.AM, Zlobie, Virus.Win32.Pioneer.bl | |
| Related spyware Qtvglped Toolbar, SmartPCKeylogger, MySpaceIM Monitor Sniffer, iWon Search Assistant, Faretoraci, WinRAR 2011 Hoax, Safetyeachday.com, SpyDestroy Pro, CrisysTec Sentry, Rootkit.Agent.grg | |
| Windows Error caused by 12hBxZ7mzn3LgT3SjCsS6yS4tVefPBWCPt are – 0x80246006 WU_E_DM_WRONGBITSVERSION A download manager operation could not be completed because the version of Background Intelligent Transfer Service (BITS) is incompatible., 0x80242017 WU_E_UH_NEW_SERVICING_STACK_REQUIRED The OS servicing stack must be updated before this update is downloaded or installed., Error 0x8007002C – 0x4001C, 0x80245002 WU_E_REDIRECTOR_S_FALSE The redirector XML document is missing some required information., 0x80240022 WU_E_ALL_UPDATES_FAILED Operation failed for all the updates., 0x00000067, 0x00000121, 0x0000006B | |
| 12hBxZ7mzn3LgT3SjCsS6yS4tVefPBWCPt infects these windows .dll files cmiv2.dll, api-ms-win-core-heap-l1-1-0.dll, odbcconf.dll, penjpn.dll, wmimsg.dll, els.dll, mchgrcoi.dll, input.dll, msadomd.dll, validcfg.dll, isatq.dll, WMIPICMP.dll |
12hBxZ7mzn3LgT3SjCsS6yS4tVefPBWCPt may have entered your pc through these software. If you have not installed them , then get rid of them Duplicate Detective , Aweditorium 1.0 , 7Contact 3.04 , InerTrak 3.5.7 , SkyFighters 1918 wMB 0.78 , US Yellow Page Search- DexKnows.com 2.0 , Flare 1.5.1 , Webcams 1.0 , PIXELS 3D 5.6b , 4Videosoft Pocket PC Video Converter , Virtual Pool Updater 1.8.8 , fmXRaySpecs 1.0.1 , aQTPlaylist 1.0.0d185 , MiMe iPhone Video Converter , CheckBook 2.5.6 |
|

Remove 12hBxZ7mzn3LgT3SjCsS6yS4tVefPBWCPt Quickly From Windows
A Brief Idea About 12hBxZ7mzn3LgT3SjCsS6yS4tVefPBWCPt
12hBxZ7mzn3LgT3SjCsS6yS4tVefPBWCPt is a perilous trojan virus infection for the computer. It is created by the hackers. This misleading malware is silently inject into the computer and capable to do malicious activities inside the computer. It installed deeply inside the system. Once it get installed, it disable antivirus and firewall protection. This malware capable to makes the system more vulnerable. It steals important information of the users and make them victim. It brings more viruses by the backdoor system that creates more damages into the computer. In short it is a risky threat that hamper your security and privacy.
How 12hBxZ7mzn3LgT3SjCsS6yS4tVefPBWCPt Will Get Intrude Into Your System?
12hBxZ7mzn3LgT3SjCsS6yS4tVefPBWCPt uses variety of methods to inject into the computer. It easily modify the Windows operating system without any permission of the user. Some of the general intrusive methods are – 12hBxZ7mzn3LgT3SjCsS6yS4tVefPBWCPt get downloaded into the system via bundled with free third party software or programs. The spam email or junk email attachments which provide the infection when user click on the attachments file to open it. The other penetrating methods are used as visiting the malicious websites like suspicious or unknown sites that you never visit before, porn websites, torrent and etc. Playing online games, downloading pirated or cracked software, network file sharing or media files can also invade 12hBxZ7mzn3LgT3SjCsS6yS4tVefPBWCPt into your system. Downloading the fake program or software updates can also deliver this virus inside the system. By clicking on the suspicious links or deceptive advertisements get redirect on the malicious site where more viruses get installed into the computer. By injecting the infections USB drives or the external media like CD, DVD, etc are also one of the most effective methods to deliver this trojan virus.
The Harmful Effects Of 12hBxZ7mzn3LgT3SjCsS6yS4tVefPBWCPt
When 12hBxZ7mzn3LgT3SjCsS6yS4tVefPBWCPt get installed into your computer, it leads to the major modification. It mess up the system and destroy the whole PC. Some of the common effects that can be visualize are:
- 12hBxZ7mzn3LgT3SjCsS6yS4tVefPBWCPt silently injects into the computer without any user’s consent.
- It destroy the computer files, programs, software and etc.
- It disable the firewall and antivirus protection.
- 12hBxZ7mzn3LgT3SjCsS6yS4tVefPBWCPt brings other similar spyware, threats, and malware inside the system.
- Block the vital features such as registry editor, task manager, control panel and etc.
- Steal financial and personal data to send it to the hackers.
- Create the new registry keys to start itself automatically into the system.
- Develop the backdoor onto the computer and allow hackers to access remotely the computer.
Manual 12hBxZ7mzn3LgT3SjCsS6yS4tVefPBWCPt Removal Guide
Step 1: How to Start your PC in Safe Mode with Networking to Get Rid of 12hBxZ7mzn3LgT3SjCsS6yS4tVefPBWCPt
(For Win 7 | XP | Vista Users)
- first of all PC is to be rebooted in Safe Mode with Networking
- Select on Start Button and Click on Shutdown | Restart option and select OK
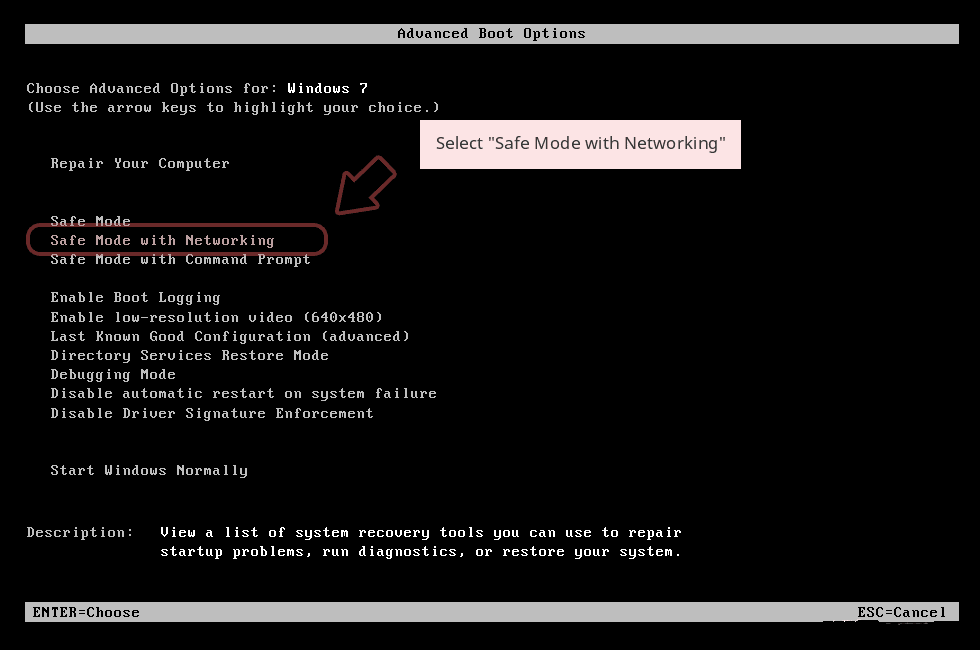
- when the PC restarts, keep tapping on F8 until you don’t get Advanced Boot Options.
- Safe Mode with Networking Option is to be selected from the list.
(For Win 8 | 8.1 | Win 10 Users)
- Click on Power Button near Windows Login Screen
- Keep Shift Button on the keyboard pressed and select Restart Option
- Now Select on Enable Safe Mode with Networking Option

In case 12hBxZ7mzn3LgT3SjCsS6yS4tVefPBWCPt, is not letting your PC to Start in Safe Mode, then following Step is to followed
Step 2: Remove 12hBxZ7mzn3LgT3SjCsS6yS4tVefPBWCPt Using System Restore Process
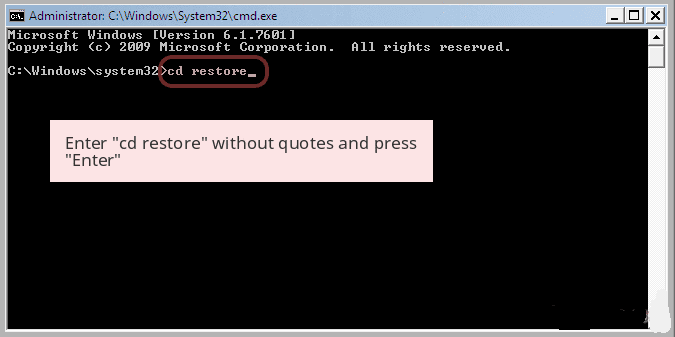
- PC need to be rebooted to Safe Mode with Command Prompt
- As soon as Command Prompt Window appear on the screen, select on cd restore and press on Enter option
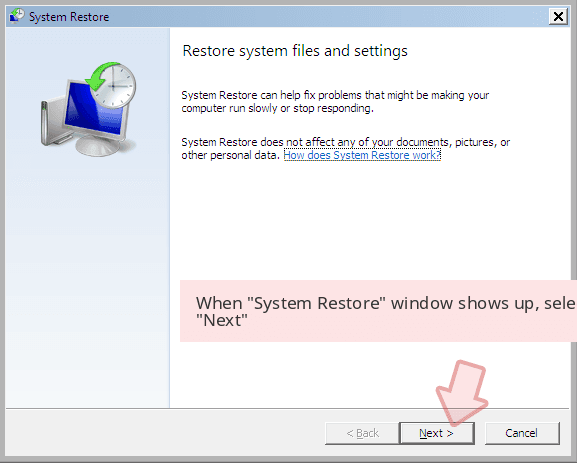
Type rstrui.exe and Click on Enter again.

Now users need to Click on Next option and Choose restore point that was the last time Windows was working fine prior to 12hBxZ7mzn3LgT3SjCsS6yS4tVefPBWCPt infection. Once done, Click on Next button.
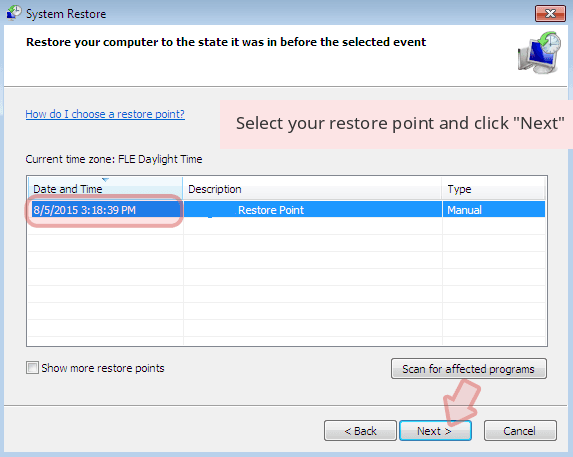
Select Yes to Restore your System and get rid of 12hBxZ7mzn3LgT3SjCsS6yS4tVefPBWCPt infection.

However, if the above steps does not work to remove 12hBxZ7mzn3LgT3SjCsS6yS4tVefPBWCPt, follow the below mentioned steps
Step:3 Unhide All Hidden Files and Folders to Delete 12hBxZ7mzn3LgT3SjCsS6yS4tVefPBWCPt
How to View 12hBxZ7mzn3LgT3SjCsS6yS4tVefPBWCPt Hidden Folders on Windows XP
- In order to show the hidden files and folders, you need to follow the given instructions:-
- Close all the Windows or minimize the opened application to go to desktop.
- Open “My Computer” by double-clicking on its icon.
- Click on Tools menu and select Folder options.
- Click on the View tab from the new Window.
- Check the Display contents of the system folders options.
- In the Hidden files and folders section, you need to put a check mark on Show hidden files and folders option.
- Click on Apply and then OK button. Now, close the Window.
- Now, you can see all the 12hBxZ7mzn3LgT3SjCsS6yS4tVefPBWCPt related hidden files and folders on the system.

How to Access 12hBxZ7mzn3LgT3SjCsS6yS4tVefPBWCPt Hidden folders on Windows Vista
- Minimize or close all opened tabs and go to Desktop.
- Go to the lower left of your screen, you will see Windows logo there, click on Start button.
- Go to Control Panel menu and click on it.
- After Control Panel got opened, there will two options, either “Classic View” or “Control Panel Home View”.
- Do the following when you are in “Classic View”.
- Double click on the icon and open Folder Options.
- Choose View tab.
- Again move to step 5.
- Do the following if you are “Control Panel Home View”.
- Hit button on Appearance and Personalization link.
- Chose Show Hidden Files or Folders.
- Under the Hidden File or Folder section, click on the button which is right next to the Show Hidden Files or Folders.
- Click on Apply button and then hit OK. Now, close the window.
- Now, to show you all hidden files or folders created by 12hBxZ7mzn3LgT3SjCsS6yS4tVefPBWCPt, you have successfully considered Windows Vista.

How to Unhide 12hBxZ7mzn3LgT3SjCsS6yS4tVefPBWCPt Created Folders on Windows 7
1. Go to the desktop and tap on the small rectangle which is located in the lower-right part of the system screen.
2. Now, just open the “Start” menu by clicking on the Windows start button which is located in the lower-left side of the PC screen that carries the windows logo.
3. Then after, look for the “Control Panel” menu option in the right-most row and open it.
4. When the Control Panel menu opens, then look for the “Folder Options” link.
5. Tap over the “View tab”.
6. Under the “Advanced Settings” category, double click on the “Hidden Files or Folders” associated with 12hBxZ7mzn3LgT3SjCsS6yS4tVefPBWCPt.
7. Next, just select the check-box in order to Show hidden files, folders, or drives.
8. After this, click on “Apply” >> “OK” and then close the menu.
9. Now, the Windows 7 should be configured to show you all hidden files, folders or drives.

Steps to Unhide 12hBxZ7mzn3LgT3SjCsS6yS4tVefPBWCPt related Files and Folders on Windows 8
- First of all, power on your Windows PC and click on start logo button that is found in left side of the system screen.
- Now, move to program lists and select control panel app.
- When Control panel is open completely, click on more settings option.
- After, you will see a Control panel Window and then you choose “Appearance and Personalization” tab.
- In Advance settings dialogue box, you need to tick mark on Show hidden files and folders and clear the check box for Hide protected system files.
- Click on Apply and Ok button. This apply option helps you to detect and eradicate all types of 12hBxZ7mzn3LgT3SjCsS6yS4tVefPBWCPt related suspicious files.
- Finally, navigate your mouse cursor on close option to exit this panel.
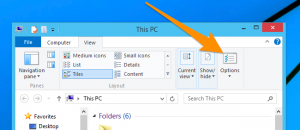
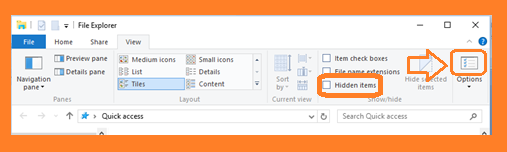
How to View 12hBxZ7mzn3LgT3SjCsS6yS4tVefPBWCPt associated folders on Windows 10
1. Open the folder if you wish to unhide files.
2. Search and Click on View in Menu bar
3. In Menu click on to view folder options.
4. Again click on View and Enable Radio Button associated with Show hidden files created by 12hBxZ7mzn3LgT3SjCsS6yS4tVefPBWCPt, folder and drive.
5. Press apply and OK.
Step 4: Press Start Key along with R- copy + paste the below stated command and Click on OK
notepad %windir%/system32/Drivers/etc/hosts
- This will open up a new file, in case if your system has been hacked, some IP’s will be shown at the bottom of the screen

Click on the Start Menu, Input “Control Panel” in the search box —> Select. Network and Internet —> Network and Sharing Center —> Next Change Adapter Settings. Right-click your Internet connection —> Select on Properties.
- In case if you find Suspicious IP in the local host –or if you are finding it difficult and have any problem then submit question to us and we will be happy to help you.

Related Posts
 Remove PyXie Trojan from Windows 10 : Take Down PyXie Trojan
- Killua Backdoor Uninstallation: Tutorial To Delete Killua Backdoor In Just Few Steps
- Remove Gon Malware from Windows 7
- EYE Malware Removal: Help To Remove EYE Malware Completely
- Delete CSPY Downloader Manually
- Possible Steps For Deleting Win32/Bundpil from Windows 10