
This post is specially designed for the victim who wanted to get rid of Echobot from the corrupted computer system. Therefore, read throughly all the instructions provided at the bottom of this section.
Summary Of Threat
| Threat’s Name | Echobot |
| Threat’s Type | Trojan Horse |
| Affected System | XP, 10, Win 32/64, 8/8.1, 7, Vista. |
| Infected Web Browser | Microsoft Edge, Google Chrome, Mozilla Firefox, Internet Explorer. |
| Risk level | Severe |
| File Decryption | Possible |
| Distributive Methods | Downloading torrents websites, fake software updater, hacked executable files etc. |
Complete Survey On Echobot
Echobot is a traitorous kind of computer infection which can be based on Mirai botnet that belongs to the Trojans Horse family. This is a new botnet that was first emerged out in 2016 by the malware researchers at Palo Alto Networks. It is very much similar to Mirai botnet that can easily infects several applications like web proxy and some softwares that carry out DDoS (Distributed Denial of Service) attacks. The main intension of developing such botnet by the cyber attackers is to collect many confidential informations that are stored on the infected machines for gaining tremendous amount of illicit revenue from the victimized users. It can also contagious different kinds of Windows based Operating System such as 7, Vista, 10, Win 32/64, XP, 8/8.1 etc and various eminent Web Browser Search Engines such as Google Chrome, Microsoft Edge, Opera, Mozilla Firefox, Internet Explorer, Safari etc.
Sources Of Echobot
Echobot is a insidious malware infection which are specially designed to target the high profile businesses rather than individual personal computers. It can quietly get infiltrated into the compromised system by using malicious distributive means such as reading junked e-mail attachments, download free things from untrusted websites, fake software updater, hacked executable files, free file hosting websites, click commercial ads embedded malicious codes, fake invoices, email spam campaigns, corrupted external drives, untrustworthy downloading sources, software bundling method, pornographic or adult sites, online gaming server, downloading torrents websites, peer to peer file sharing network etc. As it get into the affected machines it start establishing the connections to the Echobot command and Control Servers for targeting the 26 different vulnerabilities that may include several routers, computer , cameras and many more devices.
Malicious Activities Caused By Echobot
Echobot is used for disastrous malware attacks and leveraging numerous infected devices like money laundering operations, DDoS attacks, sensing some kind of spam emails etc. It can also targets the softwares used in enterprise devices like Oracle WebLogic Server, Vmware NSX SD-WAN etc.
How To Remove Echobot
The computer users are strongly advised to remove Echobot from the contaminated system by using either automatic or manual removal guide as soon as possible.
>>Free Download Echobot Scanner<<

Manual Echobot Removal Guide
Step 1: How to Start your PC in Safe Mode with Networking to Get Rid of Echobot
(For Win 7 | XP | Vista Users)
- first of all PC is to be rebooted in Safe Mode with Networking
- Select on Start Button and Click on Shutdown | Restart option and select OK
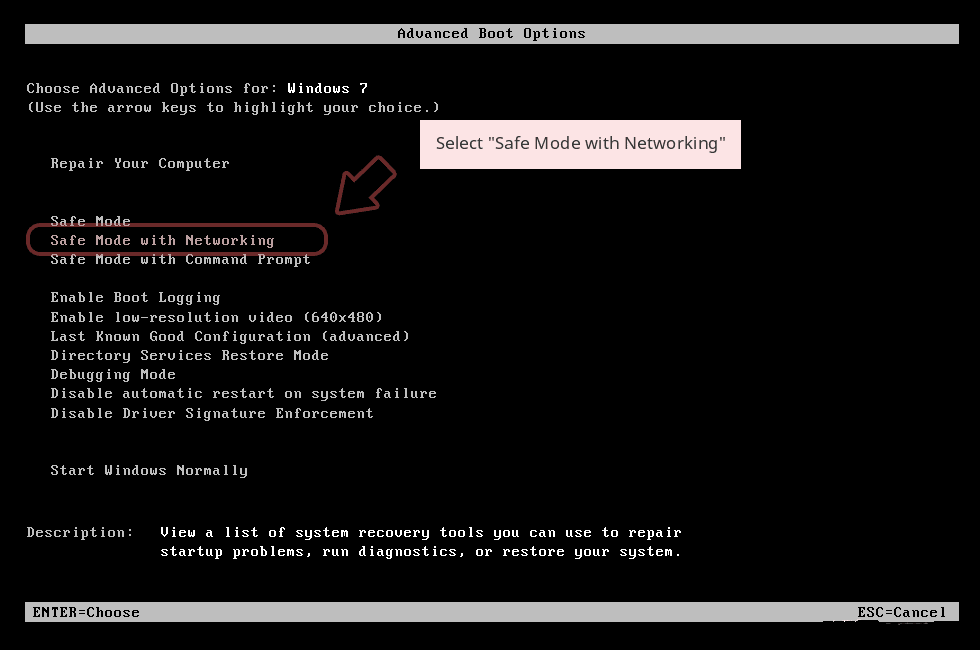
- when the PC restarts, keep tapping on F8 until you don’t get Advanced Boot Options.
- Safe Mode with Networking Option is to be selected from the list.
(For Win 8 | 8.1 | Win 10 Users)
- Click on Power Button near Windows Login Screen
- Keep Shift Button on the keyboard pressed and select Restart Option
- Now Select on Enable Safe Mode with Networking Option

In case Echobot, is not letting your PC to Start in Safe Mode, then following Step is to followed
Step 2: Remove Echobot Using System Restore Process
- PC need to be rebooted to Safe Mode with Command Prompt
- As soon as Command Prompt Window appear on the screen, select on cd restore and press on Enter option
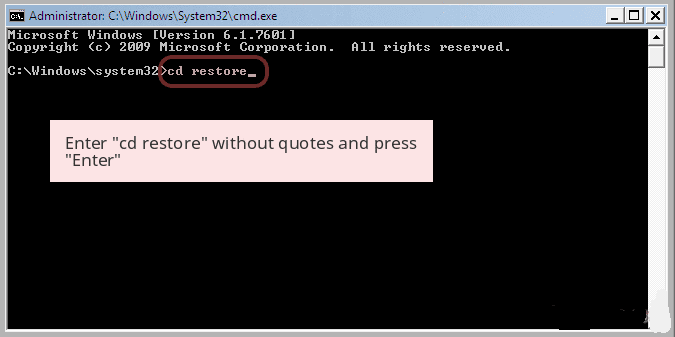
Type rstrui.exe and Click on Enter again.

Now users need to Click on Next option and Choose restore point that was the last time Windows was working fine prior to Echobot infection. Once done, Click on Next button.
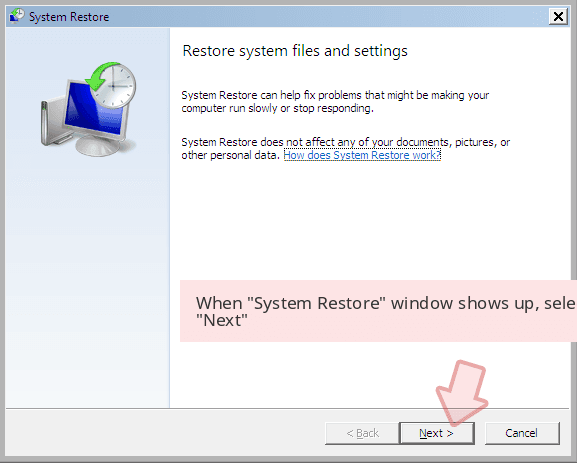
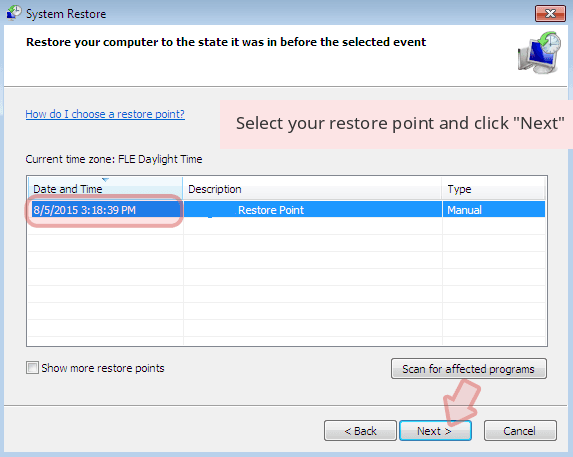
Select Yes to Restore your System and get rid of Echobot infection.

However, if the above steps does not work to remove Echobot, follow the below mentioned steps
Step:3 Unhide All Hidden Files and Folders to Delete Echobot
How to View Echobot Hidden Folders on Windows XP
- In order to show the hidden files and folders, you need to follow the given instructions:-
- Close all the Windows or minimize the opened application to go to desktop.
- Open “My Computer” by double-clicking on its icon.
- Click on Tools menu and select Folder options.
- Click on the View tab from the new Window.
- Check the Display contents of the system folders options.
- In the Hidden files and folders section, you need to put a check mark on Show hidden files and folders option.
- Click on Apply and then OK button. Now, close the Window.
- Now, you can see all the Echobot related hidden files and folders on the system.

How to Access Echobot Hidden folders on Windows Vista
- Minimize or close all opened tabs and go to Desktop.
- Go to the lower left of your screen, you will see Windows logo there, click on Start button.
- Go to Control Panel menu and click on it.
- After Control Panel got opened, there will two options, either “Classic View” or “Control Panel Home View”.
- Do the following when you are in “Classic View”.
- Double click on the icon and open Folder Options.
- Choose View tab.
- Again move to step 5.
- Do the following if you are “Control Panel Home View”.
- Hit button on Appearance and Personalization link.
- Chose Show Hidden Files or Folders.
- Under the Hidden File or Folder section, click on the button which is right next to the Show Hidden Files or Folders.
- Click on Apply button and then hit OK. Now, close the window.
- Now, to show you all hidden files or folders created by Echobot, you have successfully considered Windows Vista.

How to Unhide Echobot Created Folders on Windows 7
1. Go to the desktop and tap on the small rectangle which is located in the lower-right part of the system screen.
2. Now, just open the “Start” menu by clicking on the Windows start button which is located in the lower-left side of the PC screen that carries the windows logo.
3. Then after, look for the “Control Panel” menu option in the right-most row and open it.
4. When the Control Panel menu opens, then look for the “Folder Options” link.
5. Tap over the “View tab”.
6. Under the “Advanced Settings” category, double click on the “Hidden Files or Folders” associated with Echobot.
7. Next, just select the check-box in order to Show hidden files, folders, or drives.
8. After this, click on “Apply” >> “OK” and then close the menu.
9. Now, the Windows 7 should be configured to show you all hidden files, folders or drives.

Steps to Unhide Echobot related Files and Folders on Windows 8
- First of all, power on your Windows PC and click on start logo button that is found in left side of the system screen.
- Now, move to program lists and select control panel app.
- When Control panel is open completely, click on more settings option.
- After, you will see a Control panel Window and then you choose “Appearance and Personalization” tab.
- In Advance settings dialogue box, you need to tick mark on Show hidden files and folders and clear the check box for Hide protected system files.
- Click on Apply and Ok button. This apply option helps you to detect and eradicate all types of Echobot related suspicious files.
- Finally, navigate your mouse cursor on close option to exit this panel.
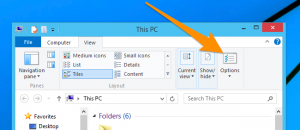
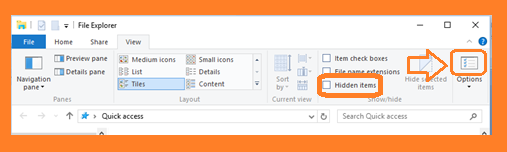
How to View Echobot associated folders on Windows 10
1. Open the folder if you wish to unhide files.
2. Search and Click on View in Menu bar
3. In Menu click on to view folder options.
4. Again click on View and Enable Radio Button associated with Show hidden files created by Echobot, folder and drive.
5. Press apply and OK.
Step 4: Press Start Key along with R- copy + paste the below stated command and Click on OK
notepad %windir%/system32/Drivers/etc/hosts
- This will open up a new file, in case if your system has been hacked, some IP’s will be shown at the bottom of the screen

Click on the Start Menu, Input “Control Panel” in the search box —> Select. Network and Internet —> Network and Sharing Center —> Next Change Adapter Settings. Right-click your Internet connection —> Select on Properties.
- In case if you find Suspicious IP in the local host –or if you are finding it difficult and have any problem then submit question to us and we will be happy to help you.


Related Posts
 Remove PyXie Trojan from Windows 10 : Take Down PyXie Trojan
- Killua Backdoor Uninstallation: Tutorial To Delete Killua Backdoor In Just Few Steps
- Remove Gon Malware from Windows 7
- EYE Malware Removal: Help To Remove EYE Malware Completely
- Delete CSPY Downloader Manually
- Possible Steps For Deleting Win32/Bundpil from Windows 10