
Threat Summary
| Threat Name | Go.next-search.net |
| Threat Type | Browser Hijacker |
| Created By | ClientConnect Ltd |
| Infected System | XP, 7, 10, 8.1, 8, Vista. |
| Affected Browser | Internet Explorer, Mozilla Firefox, Google Chrome, Opera, Microsoft Edge. |
| Risk level | Medium |
| File Decryption | Possible |
| Distributive Methods | reading junked e-mail attachments, updates of Java scripts, fake invoices, downloading torrents websites etc. |
Deep Analysis About Go.next-search.net
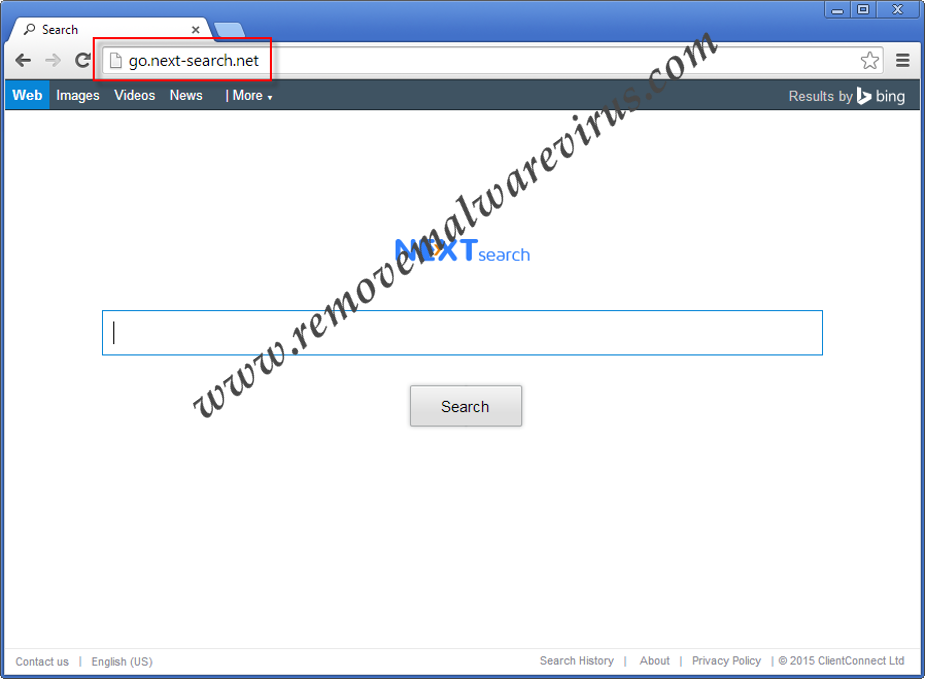
Go.next-search.net is a precarious computer infection that belongs to the browser hijacker category. Basically this browser hijacker is an Internet portal which has been developed by the ClientConnect Ltd. This web site actually legitimated as a search protect browser extension and get redirected towards go.next-search.net webpage. It can affects several Windows platform based Operating System such as 8, 7, Vista, 8.1, XP, 10 etc and various popular Web Browsers Internet Explorer, Opera, Mozilla Firefox, Safari, Google Chrome, Microsoft Edge etc. The prime motive of designing this browser extension by the remote hackers is to withdraw tremendous amount of online money from the innocent victimized users of the compromised computer. This is next-search.net Domain Name of Go.next-search.net and its Registrar name is GoDaddy.com, LLC which was recently got Registered on 30-09-2014 and also got Updated on 06-12-2018. Its Registry Domain ID is 1878304799_DOMAIN_NET-VRSN and its Status is maintained as clientDeleteProhibited, clientRenewProhibited, clientTransferProhibited, clientUpdateProhibited their Servers Name are ns1.p23.dynect.net, ns2.p23.dynect.net, ns3.p23.dynect.net, ns4.p23.dynect.net.
Evidences Of Go.next-search.net
Go.next-search.net is a notorious cyber threat that pretends to be like some regular search engine provider but actually it never provides any relevant results. Instead displays numerous pop- up advertisements on the computer screen and always gets redirected to some malicious web site links. It can soundlessly get invaded into the compromised computer system using many dispersal ways such as untrustworthy third party software down-loader, clicking suspicious pop-up ads, fake software updater, downloading torrents websites, peer to peer file sharing network, corrupted external drives, fake invoices, software bundling method, hacked executable files, reading junked e-mail attachments, free file hosting websites, email spam campaigns, pornographic or adult sites, online gaming server, untrustworthy downloading sources etc. It is PUP based browser extension that is capable of generating online income through Cost Per Click techniques.
Ill Behavior Of Go.next-search.net
Go.next-search.net is a fake browser extension that can causes several redirections to the suspicious website links where plenty of annoying pop -up ads are displayed on the compromised computer screen of the users. Its system speed and performances both get decreases. Without any user authorization many malicious programs get installed automatically on thew deceived machines.
Why To Uninstall Go.next-search.net
The simplest easy method to uninstall such Go.next-search.netis browser hijacker from the victmized machine by using either of the ways like automatic or manual techniques.
>>Free Download Go.next-search.net Scanner<<

Know How to Uninstall Go.next-search.net Manually From Windows PC
In order to do it, it is advised that, start your PC in safe mode by just following the steps:-
Step 1. Restart your computer and Press F8 button until you get the next window.

Step 2. After that on the new screen you should select Safe Mode option to continue this process.

Now Show Hidden Files As Follows :
Step 1. Go to Start Menu >> Control Panel >> Folder Option.

Step 2. Now Press View Tab >> Advance Setting category >> Hidden Files or Folders.

Step 3. Here you need to tick in Show hidden files, folder or drives.
Step 4. Finally hit Apply and then OK button and at the end close the current Window.
Time To Delete Go.next-search.net From Different Web browsers
For Google Chrome
Steps 1. Start Google Chrome and hot Menu icon at the top right corner of the screen and then select Settings option.

Step 2. Here you need to select required search provider in Search option.

Step 3. You can also manage search engine and make it your personalize setting by clicking on Make it default button.

Reset Google Chrome Now in given way:-
Step 1. Get Menu Icon >> Settings >> Reset settings >> Reset

For Mozilla Firefox:-
Step 1. Start Mozilla Firefox >> Setting icon >> Options.

Step 2. Press Search option and pick required search provider to make it default and also remove Go.next-search.net from here.

Step 3. You can also add other search option on your Mozilla Firefox.
Reset Mozilla Firefox
Step 1. Choose Settings >> Open Help Menu >> Troubleshooting >> Reset Firefox

Step 2. Again click Reset Firefox to eliminate Go.next-search.net in easy clicks.

For Internet Explorer
If you want to remove Go.next-search.net from Internet Explorer then please follow these steps.
Step 1. Start your IE browser and select Gear icon >> Manage Add-ons.

Step 2. Choose Search provider >> Find More Search Providers.

Step 3. Here you can select your preferred search engine.

Step 4. Now Press Add to Internet Explorer option >> Check out Make this my Default Search Engine Provider From Add Search Provider Window and then click Add option.

Step 5. Finally relaunch the browser to apply all modification.
Reset Internet Explorer
Step 1. Click on Gear Icon >> Internet Options >> Advance Tab >> Reset >> Tick Delete Personal Settings >> then press Reset to remove Go.next-search.net completely.

Clear browsing History and Delete All Cookies
Step 1. Start with the Internet Options >> General Tab >> Browsing History >> Select delete >> Check Website Data and Cookies and then finally Click Delete.

Know How To Fix DNS Settings
Step 1. Navigate to the bottom right corner of your desktop and right click on Network icon, further tap on Open Network and Sharing Center.

Step 2. In the View your active networks section, you have to choose Local Area Connection.

Step 3. Click Properties at the bottom of Local Area Connection Status window.

Step 4. Next you have to choose Internet Protocol Version 4 (TCP/IP V4) and then tap on Properties below.

Step 5. Finally enable the Obtain DNS server address automatically option and tap on OK button apply changes.


Well if you are still facing issues in removal of malware threats then you can feel free to ask questions. We will feel obliged to help you.

Related Posts
 ExecutiveOperation Search Removal: Best Way To Remove ExecutiveOperation Search In Simple Clicks
- Best Way To Get Rid Of IMovieSearch Search
- Delete MixedFin from Internet Explorer : Clear Away MixedFin
- Deleting Search-fine.com Manually
- Delete Search.basicgeneration.com from Opera
- Removing Spacerin Search Easily