| NOKKI malware is a Worm | |
| Trojan Dropped by NOKKI malware are Necro Trojan, Bamital.D, PWSteal.QQGame.D, I-Worm.Benatic.a, IRC-Worm.Septic, VirTool:MSIL/Injector.Q, Trojan-PSW.Win32.Certif.a, KillAV.rx, HTML/iFrame.B, Trojan.MineBicoin.A, Trojan.Spy.Bafi.G | |
| Related spyware Application.The_PC_Detective, CasinoOnNet, Stealth Web Page Recorder, SafeSurfing, InternetAlert, Worm.Edibara.A, Surf Spy, ActiveX_blocklist, Worm.Zlybot | |
| Windows Error caused by NOKKI malware are – 0x00000045, 0xf0801 CBS_E_NOT_INITIALIZED session not initialized, 0x000000B9, 0x80243004 WU_E_TRAYICON_FAILURE A failure occurred when trying to create an icon in the taskbar notification area., 0x80243003 WU_E_INSTALLATION_RESULTS_NOT_FOUND The results of download and installation are not available; the operation may have failed to start., 0x80240042 WU_E_UNKNOWN_SERVICE The update service is no longer registered with AU., 0x000000CF, 0x8024800A WU_E_DS_UNKNOWNHANDLER The update was not processed because its update handler could not be recognized., 0x00000019, 0xf081C CBS_E_EXCESSIVE_EVALUATION Watchlist: not able to reach steady state after too many attempts. | |
| NOKKI malware infects these windows .dll files WindowsUltimateExtrasCPL.dll, vsswmi.dll, api-ms-win-core-processenvironment-l1-1-0.dll, d2d1.dll, WpdConns.dll, bootvid.dll, System.Web.Services.Resources.dll, TlsRepPlugin.dll, sdiagschd.dll, MpCommu.dll, WsmCl.dll, iisext.dll, puiobj.dll, hpfvew73.dll |
NOKKI malware may have entered your pc through these software. If you have not installed them , then get rid of them Passport Photo Studio 1.5.1 , Balloon Helper 1.0 , Formula Racing 2.0 , EasyDMG 1.5 , Nimbus 2.0 , GHOST 2.1.0 , Carpe Diem 1.0.0 , SubPixel Display 2.2.0 , RAV AntiVirus for MailServers X 1.0b1 , Death Upon an Austrian Sonata: A Dana Kingstone Novel CE 1.0 , Click Archive 1.1 , Lyric Legend 1.0 , Virtual City Playground® , Ovulation Calendar 2.1 , Domainer , Meta 2.0.16 , My Beautiful Vacation 1.5 , Sleepyhead 1.0 |
|


Helpful Steps To Remove NOKKI malware From PC
Are you unable to remove NOKKI malware from your system? Is this really annoying you and your activities? Even your anti-virus program unable to remove it completely from the system? Then you are at right place. You need to read the instructions given below to get easy tips to remove the malware completely from the system.
NOKKI malware is an unwanted computer infection which is deemed as trojan virus. This unwanted program gets into your computer system silently without asking your permission. This may come as the result of reckless internet surfing or installation of free software. It quickly gets spread inside the system to do many harmful and illegal activities on the system. It has the ability to change the important settings of the compromised PC then to permit running of its notorious programs causing too many severe damages to the system. It has been created by the group of cyber crooks with the evil intention to corrupt and damage entire compromised PC. Once the trojan virus arrives on PC, it will hide its malicious files inside the legit system files so that no any program can detect its presence easily. If you thinking that you have anti-virus program installed on your system that will remove it then you are wrong.
All the installed anti-virus program are already disabled by NOKKI malware so that no one could stop it from invading the system. Being a hideous and treacherous program, it is not easy to detect all its files and perform complete removal of trojan virus. Targeted system is brutally damaged and affects overall performance of computer. Crucial system files are corrupted causing the PC to behave in weird and abnormal way. This malevolent program establishes connection between remote server and targeted PC in order to receive instructions and download harmful files and programs.
For novice PC users, dealing with this stubborn virus may be difficult for it constantly changes its location and names at regular intervals. NOKKI malware will cause your PC to crash or freeze at times. Some of your important system files and applications would be deleted by the malware. It will soon add corrupt entries to the registry editor. In order to fix all those troubles, you are advised to opt for powerful and efficient anti-virus tool that will help you remove NOKKI malware completely.
Manual NOKKI malware Removal Guide
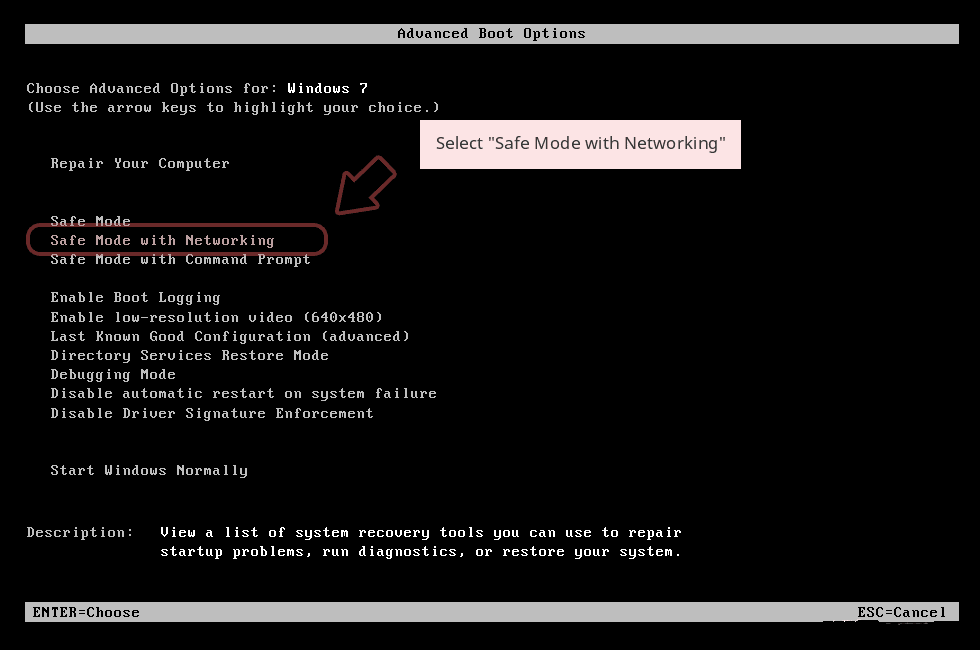
Step 1: How to Start your PC in Safe Mode with Networking to Get Rid of NOKKI malware
(For Win 7 | XP | Vista Users)
- first of all PC is to be rebooted in Safe Mode with Networking
- Select on Start Button and Click on Shutdown | Restart option and select OK
- when the PC restarts, keep tapping on F8 until you don’t get Advanced Boot Options.
- Safe Mode with Networking Option is to be selected from the list.
(For Win 8 | 8.1 | Win 10 Users)
- Click on Power Button near Windows Login Screen
- Keep Shift Button on the keyboard pressed and select Restart Option
- Now Select on Enable Safe Mode with Networking Option

In case NOKKI malware, is not letting your PC to Start in Safe Mode, then following Step is to followed
Step 2: Remove NOKKI malware Using System Restore Process
- PC need to be rebooted to Safe Mode with Command Prompt
- As soon as Command Prompt Window appear on the screen, select on cd restore and press on Enter option
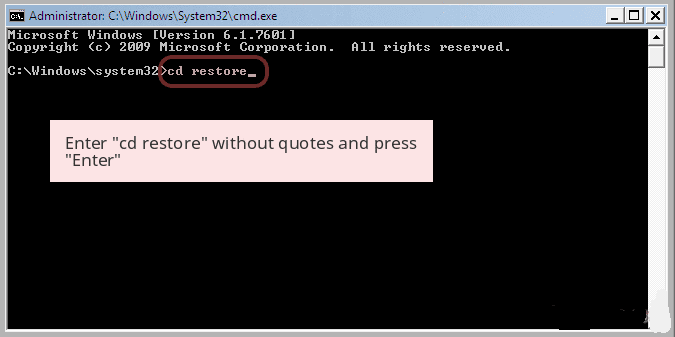
Type rstrui.exe and Click on Enter again.

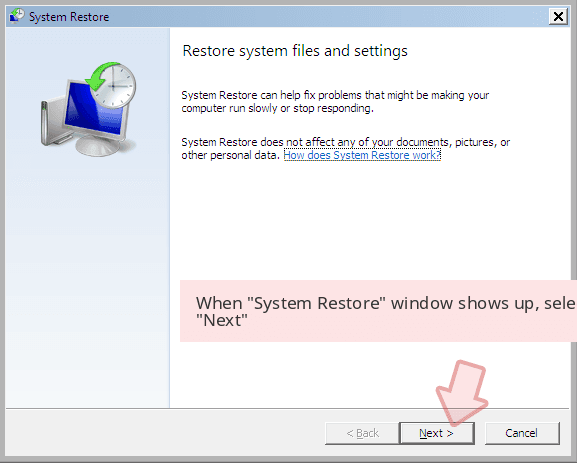
Now users need to Click on Next option and Choose restore point that was the last time Windows was working fine prior to NOKKI malware infection. Once done, Click on Next button.
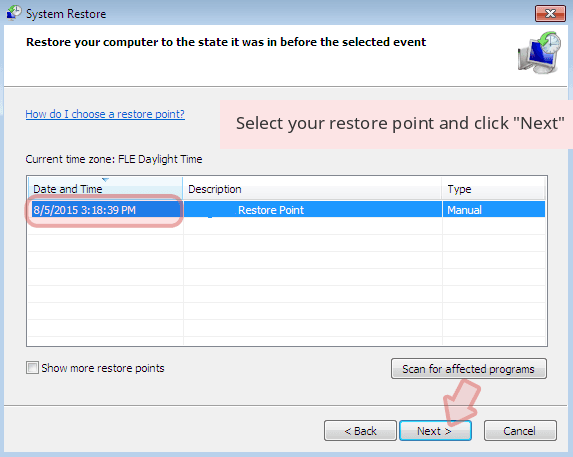
Select Yes to Restore your System and get rid of NOKKI malware infection.

However, if the above steps does not work to remove NOKKI malware, follow the below mentioned steps
Step:3 Unhide All Hidden Files and Folders to Delete NOKKI malware
How to View NOKKI malware Hidden Folders on Windows XP
- In order to show the hidden files and folders, you need to follow the given instructions:-
- Close all the Windows or minimize the opened application to go to desktop.
- Open “My Computer” by double-clicking on its icon.
- Click on Tools menu and select Folder options.
- Click on the View tab from the new Window.
- Check the Display contents of the system folders options.
- In the Hidden files and folders section, you need to put a check mark on Show hidden files and folders option.
- Click on Apply and then OK button. Now, close the Window.
- Now, you can see all the NOKKI malware related hidden files and folders on the system.

How to Access NOKKI malware Hidden folders on Windows Vista
- Minimize or close all opened tabs and go to Desktop.
- Go to the lower left of your screen, you will see Windows logo there, click on Start button.
- Go to Control Panel menu and click on it.
- After Control Panel got opened, there will two options, either “Classic View” or “Control Panel Home View”.
- Do the following when you are in “Classic View”.
- Double click on the icon and open Folder Options.
- Choose View tab.
- Again move to step 5.
- Do the following if you are “Control Panel Home View”.
- Hit button on Appearance and Personalization link.
- Chose Show Hidden Files or Folders.
- Under the Hidden File or Folder section, click on the button which is right next to the Show Hidden Files or Folders.
- Click on Apply button and then hit OK. Now, close the window.
- Now, to show you all hidden files or folders created by NOKKI malware, you have successfully considered Windows Vista.

How to Unhide NOKKI malware Created Folders on Windows 7
1. Go to the desktop and tap on the small rectangle which is located in the lower-right part of the system screen.
2. Now, just open the “Start” menu by clicking on the Windows start button which is located in the lower-left side of the PC screen that carries the windows logo.
3. Then after, look for the “Control Panel” menu option in the right-most row and open it.
4. When the Control Panel menu opens, then look for the “Folder Options” link.
5. Tap over the “View tab”.
6. Under the “Advanced Settings” category, double click on the “Hidden Files or Folders” associated with NOKKI malware.
7. Next, just select the check-box in order to Show hidden files, folders, or drives.
8. After this, click on “Apply” >> “OK” and then close the menu.
9. Now, the Windows 7 should be configured to show you all hidden files, folders or drives.

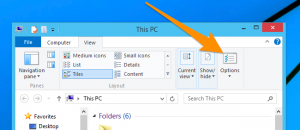
Steps to Unhide NOKKI malware related Files and Folders on Windows 8
- First of all, power on your Windows PC and click on start logo button that is found in left side of the system screen.
- Now, move to program lists and select control panel app.
- When Control panel is open completely, click on more settings option.
- After, you will see a Control panel Window and then you choose “Appearance and Personalization” tab.
- In Advance settings dialogue box, you need to tick mark on Show hidden files and folders and clear the check box for Hide protected system files.
- Click on Apply and Ok button. This apply option helps you to detect and eradicate all types of NOKKI malware related suspicious files.
- Finally, navigate your mouse cursor on close option to exit this panel.
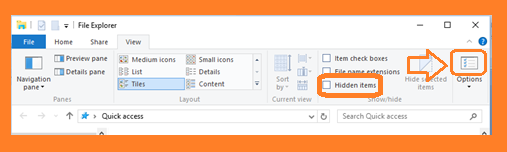
How to View NOKKI malware associated folders on Windows 10
1. Open the folder if you wish to unhide files.
2. Search and Click on View in Menu bar
3. In Menu click on to view folder options.
4. Again click on View and Enable Radio Button associated with Show hidden files created by NOKKI malware, folder and drive.
5. Press apply and OK.
Step 4: Press Start Key along with R- copy + paste the below stated command and Click on OK
notepad %windir%/system32/Drivers/etc/hosts
- This will open up a new file, in case if your system has been hacked, some IP’s will be shown at the bottom of the screen

Click on the Start Menu, Input “Control Panel” in the search box —> Select. Network and Internet —> Network and Sharing Center —> Next Change Adapter Settings. Right-click your Internet connection —> Select on Properties.
- In case if you find Suspicious IP in the local host –or if you are finding it difficult and have any problem then submit question to us and we will be happy to help you.

Related Posts
 Remove PyXie Trojan from Windows 10 : Take Down PyXie Trojan
- Killua Backdoor Uninstallation: Tutorial To Delete Killua Backdoor In Just Few Steps
- Remove Gon Malware from Windows 7
- EYE Malware Removal: Help To Remove EYE Malware Completely
- Delete CSPY Downloader Manually
- Possible Steps For Deleting Win32/Bundpil from Windows 10