| Vigua.a Virus is a Worm | |
| Trojan Dropped by Vigua.a Virus are Trojan-Dropper.Win32.Drooptroop.cpt, Trojan.C2Lop.A, Viruscan Trojan, Puce.T, PWSteal.Banker.N, I-Worm.Ardurk, Nuqel.F, Trojan Horse PSW.Agent.ASOI, VirTool:MSIL/Injector.CP, Trojan.Paramis.C, Autorun.ZI, TrojanSpy:Win64/Ursnif.C | |
| Related spyware Accoona, PerformanceOptimizer, VirusEraser, EmailSpyMonitor, Infoaxe, Adware.RelatedLinks, SpyMaxx, PCPrivacyTool, User Logger | |
| Windows Error caused by Vigua.a Virus are – 0xf080E CBS_E_MANIFEST_VALIDATION_DUPLICATE_ATTRIBUTES multiple attributes have the same name, 0x0000010F, 0x8024001A WU_E_POLICY_NOT_SET A policy value was not set., 0xf0803 CBS_S_STACK_SHUTDOWN_REQUIRED servicing stack updated, aborting, 0x8024800D WU_E_DS_NOCATEGORIES The category was not added because it contains no parent categories and is not a top-level category itself., 0x000000F7, 0xf0812 CBS_E_MANIFEST_VALIDATION_UPDATES_PARENT_MISSING required attributes are missing, Error 0x80240031, 0x80240011 WU_E_INVALID_RELATIONSHIP An invalid update relationship was detected., 0x00000031, Error 0xC1900101 – 0x20017 | |
| Vigua.a Virus infects these windows .dll files api-ms-win-core-io-l1-1-0.dll, avicap32.dll, EventViewer.ni.dll, kbdcr.dll, Ph6xIB32MV.dll, gpkcsp.dll, Microsoft.Windows.Diagnosis.Commands.UpdateDiagReport.ni.dll, imapi.dll, comaddin.dll, Microsoft.Web.Management.Ftp.dll, defragproxy.dll, Microsoft.ApplicationId.Framework.Resources.dll, guitrn_a.dll |
Vigua.a Virus may have entered your pc through these software. If you have not installed them , then get rid of them Cleaner 5 Updater 5.1.2 , RF Toolbox 3.2 , shadowBurn 1.0 , Super SIDekick X 1.1 , Punctuate This! 2.0.2 , Impression 2.0.1 , BlueChip 1.5 , RSSimple 1.1 , Oregon Coast Hotels Widget 1.2 , Photofont Start 1.0 , Glyphs v1.4.4 , Boris Continuum Cartoon Look 6.0.3 , cTiVo 2.3.1 , BDRuleEditor X 1.0.1 , Byword 2.0.3 , Com Center 1.2.1 , Eahoosoft WMA MP3 Converter |
|


How To Delete Vigua.a Virus Quickly From Your Computer
Do You Know About Vigua.a Virus
Vigua.a Virus is a trojan virus which hamper your computer by several unwanted activities. It comes via different methods like unsafe network file sharing, freeware downloads, shareware, etc. This trojan virus has deeply inserted itself and it is very tough to erase from the system. It creates the file automatically without users awareness. It actually intrude PC without your consent. It attacks all version of computer. Once it enter into your PC, firstly it blocks your antivirus protection.
What Are The Major Signs Of Vigua.a Virus Activities
- The computer program will disappear from its memory.
- Unexpected music or sound will start to play.
- New antivirus program will not install properly.
- Files which open have more than one extension like .exe, .gif or .jpg.
- Unusual error message start to pop-up.
- Item will not print correctly.
- Menus and dialog box will get different.
- Disk drives become inaccessible.
- Applications will not work correctly.
- Computer starts to reboot by it’s own.
- System restart continuously.
- System will stops to respond.
- Processing speed will lose by the computer.
How Vigua.a Virus provides Harm The Computer
After penetrating this Vigua.a Virus your computer will starts to control remotely by the hackers. It creates the loopholes which helps other viruses to enter into the computer either it will be adware, spyware, worms or threats. It provides several kinds of unwanted happening inside your computer. Hackers get the chance to grab your data and disturb your privacy. They are so intelligent as they monitor your every activity remotely. They make money from your data and in this situation you may encounter some problems. So, it is recommended here that you should take a step to remove Vigua.a Virus instantly from your computer.
Steps To Prevent Your Machine From Vigua.a Virus
- You should install the antivirus software.
- You should update it regularly.
- Scan your system daily by the updated antivirus software.
- Use the strong password that your data will be safe
- Keep your operating system updated.
- You should disable auto-run.
- Disable the Outlook image previews
- Don’t click on email attachments or links send by unknown sender.
Manual Vigua.a Virus Removal Guide
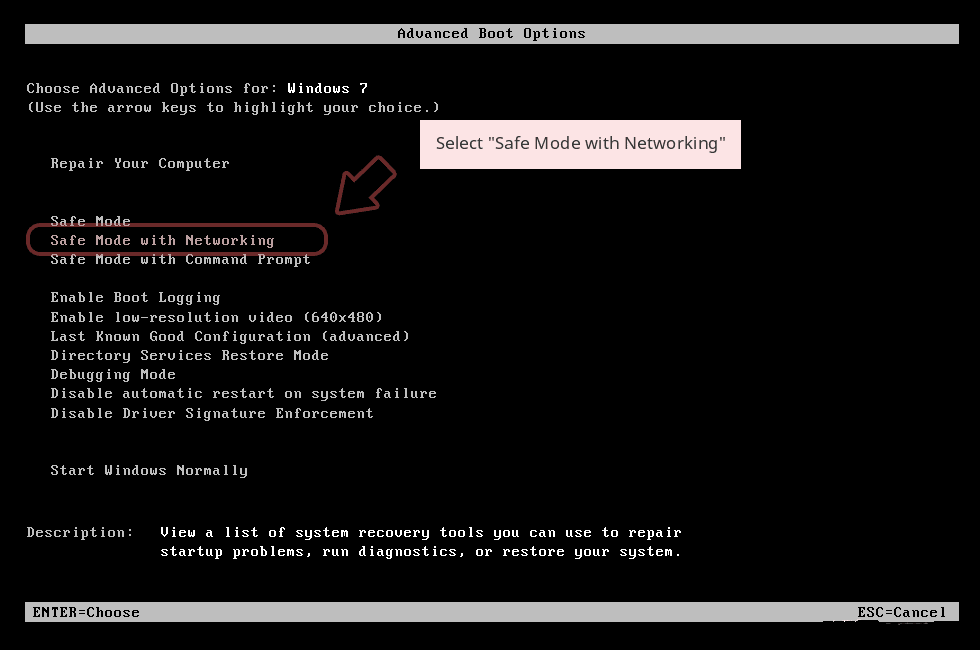
Step 1: How to Start your PC in Safe Mode with Networking to Get Rid of Vigua.a Virus
(For Win 7 | XP | Vista Users)
- first of all PC is to be rebooted in Safe Mode with Networking
- Select on Start Button and Click on Shutdown | Restart option and select OK
- when the PC restarts, keep tapping on F8 until you don’t get Advanced Boot Options.
- Safe Mode with Networking Option is to be selected from the list.
(For Win 8 | 8.1 | Win 10 Users)
- Click on Power Button near Windows Login Screen
- Keep Shift Button on the keyboard pressed and select Restart Option
- Now Select on Enable Safe Mode with Networking Option

In case Vigua.a Virus, is not letting your PC to Start in Safe Mode, then following Step is to followed
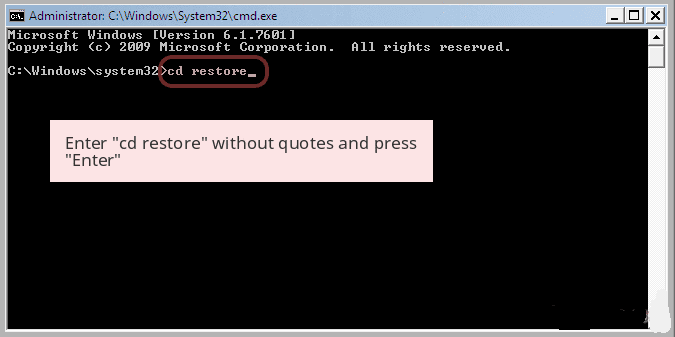
Step 2: Remove Vigua.a Virus Using System Restore Process
- PC need to be rebooted to Safe Mode with Command Prompt
- As soon as Command Prompt Window appear on the screen, select on cd restore and press on Enter option
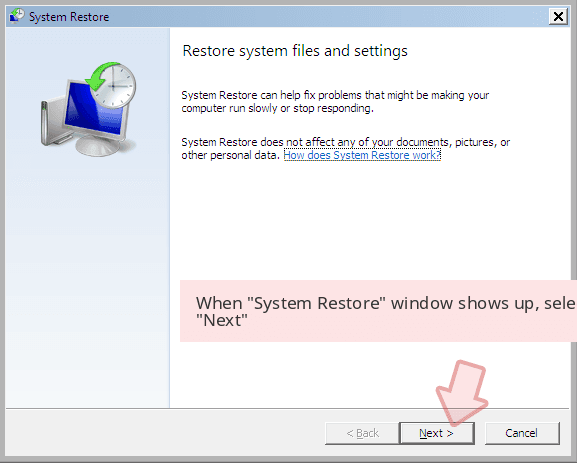
Type rstrui.exe and Click on Enter again.

Now users need to Click on Next option and Choose restore point that was the last time Windows was working fine prior to Vigua.a Virus infection. Once done, Click on Next button.
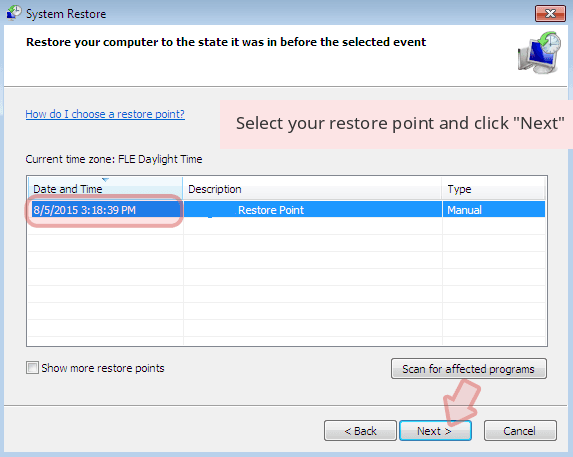
Select Yes to Restore your System and get rid of Vigua.a Virus infection.

However, if the above steps does not work to remove Vigua.a Virus, follow the below mentioned steps
Step:3 Unhide All Hidden Files and Folders to Delete Vigua.a Virus
How to View Vigua.a Virus Hidden Folders on Windows XP
- In order to show the hidden files and folders, you need to follow the given instructions:-
- Close all the Windows or minimize the opened application to go to desktop.
- Open “My Computer” by double-clicking on its icon.
- Click on Tools menu and select Folder options.
- Click on the View tab from the new Window.
- Check the Display contents of the system folders options.
- In the Hidden files and folders section, you need to put a check mark on Show hidden files and folders option.
- Click on Apply and then OK button. Now, close the Window.
- Now, you can see all the Vigua.a Virus related hidden files and folders on the system.

How to Access Vigua.a Virus Hidden folders on Windows Vista
- Minimize or close all opened tabs and go to Desktop.
- Go to the lower left of your screen, you will see Windows logo there, click on Start button.
- Go to Control Panel menu and click on it.
- After Control Panel got opened, there will two options, either “Classic View” or “Control Panel Home View”.
- Do the following when you are in “Classic View”.
- Double click on the icon and open Folder Options.
- Choose View tab.
- Again move to step 5.
- Do the following if you are “Control Panel Home View”.
- Hit button on Appearance and Personalization link.
- Chose Show Hidden Files or Folders.
- Under the Hidden File or Folder section, click on the button which is right next to the Show Hidden Files or Folders.
- Click on Apply button and then hit OK. Now, close the window.
- Now, to show you all hidden files or folders created by Vigua.a Virus, you have successfully considered Windows Vista.

How to Unhide Vigua.a Virus Created Folders on Windows 7
1. Go to the desktop and tap on the small rectangle which is located in the lower-right part of the system screen.
2. Now, just open the “Start” menu by clicking on the Windows start button which is located in the lower-left side of the PC screen that carries the windows logo.
3. Then after, look for the “Control Panel” menu option in the right-most row and open it.
4. When the Control Panel menu opens, then look for the “Folder Options” link.
5. Tap over the “View tab”.
6. Under the “Advanced Settings” category, double click on the “Hidden Files or Folders” associated with Vigua.a Virus.
7. Next, just select the check-box in order to Show hidden files, folders, or drives.
8. After this, click on “Apply” >> “OK” and then close the menu.
9. Now, the Windows 7 should be configured to show you all hidden files, folders or drives.

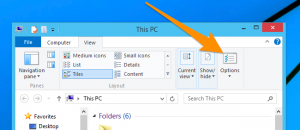
Steps to Unhide Vigua.a Virus related Files and Folders on Windows 8
- First of all, power on your Windows PC and click on start logo button that is found in left side of the system screen.
- Now, move to program lists and select control panel app.
- When Control panel is open completely, click on more settings option.
- After, you will see a Control panel Window and then you choose “Appearance and Personalization” tab.
- In Advance settings dialogue box, you need to tick mark on Show hidden files and folders and clear the check box for Hide protected system files.
- Click on Apply and Ok button. This apply option helps you to detect and eradicate all types of Vigua.a Virus related suspicious files.
- Finally, navigate your mouse cursor on close option to exit this panel.
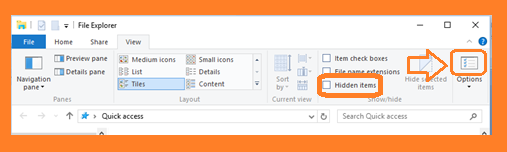
How to View Vigua.a Virus associated folders on Windows 10
1. Open the folder if you wish to unhide files.
2. Search and Click on View in Menu bar
3. In Menu click on to view folder options.
4. Again click on View and Enable Radio Button associated with Show hidden files created by Vigua.a Virus, folder and drive.
5. Press apply and OK.
Step 4: Press Start Key along with R- copy + paste the below stated command and Click on OK
notepad %windir%/system32/Drivers/etc/hosts
- This will open up a new file, in case if your system has been hacked, some IP’s will be shown at the bottom of the screen

Click on the Start Menu, Input “Control Panel” in the search box —> Select. Network and Internet —> Network and Sharing Center —> Next Change Adapter Settings. Right-click your Internet connection —> Select on Properties.
- In case if you find Suspicious IP in the local host –or if you are finding it difficult and have any problem then submit question to us and we will be happy to help you.

Related Posts
 Remove PyXie Trojan from Windows 10 : Take Down PyXie Trojan
- Killua Backdoor Uninstallation: Tutorial To Delete Killua Backdoor In Just Few Steps
- Remove Gon Malware from Windows 7
- EYE Malware Removal: Help To Remove EYE Malware Completely
- Delete CSPY Downloader Manually
- Possible Steps For Deleting Win32/Bundpil from Windows 10