How to upgrade to Windows 10 for free in 2019 ?

In November 2017, Microsoft announced quietly that Windows 10 was shutting down its free Windows 10 upgrade program. Now, finally Microsoft announced to upgrade to Windows 10 for free in 2019. We are thankful to Microsoft for giving us Windows 10 for free upgrade. It ensures that you will get the most latest and recently coming features and security improvements for your current version of Windows. It comes with high and excellent security, durability and great design. It brings out new features with great looks. At the time of updation, you’ll get the latest fixes and security improvements which helps your PC to run smoothly, efficiently and stay protected.
To upgrade your previous versions of Windows Operating System to the latest Windows 10, you will need to have a genuine Windows 7,8,8.1 serial number to upgrade to Windows 10 for free. But one thing you should keep in mind that you will also need to have a backup of your vital data first from getting lost forever from previous Windows Operating System. For upgrading to Windows 10 for free, it needs some basic requirements for installing Windows 10 like 1 GHz or faster processor or system on a chip(SoC), 1 GB for 32-bit and 2 GB for 64-bit, 16 GB for 32-bit OS and 32 GB for 64-bit OS hard drive spaces, Graphics card having DirectX 9 or later with WDDM 1.0 driver and last Display of 800×600.
To upgrade Windows 10 for free in 2019, follow this simple steps mentioned below:
Step 1: Click on Start icon from the Taskbar.
Step 2: Right after that click on Settings.
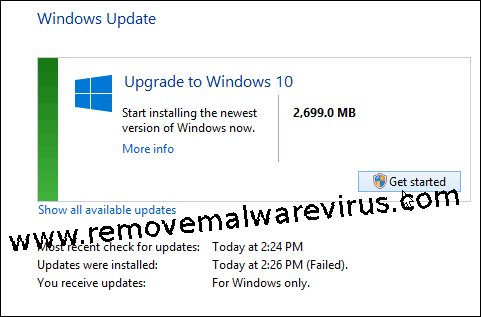
Step 3: A Settings window appears. Click on Update and Security option.
 Step 4: Right after that click on Windows Update option.
Step 5: Select on Check for updates option.
Step 6: If updates are available then install them.
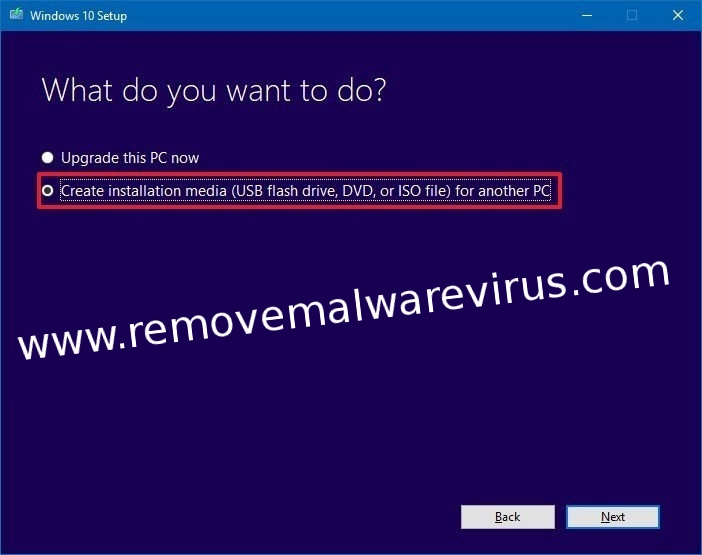
To install Windows 10 through external devices(USB drives and DVDs), follow this simple steps mentioned below:
Step 1: Use ISO file of Windows 10 from a USB device or external devices and install it.
Step 2: A dialogue box appears where it asks you to select 32 or 64 bit versions of Windows.
Step 3: After that Restart the computer and press F2 to create a different boot priority. This will allow the USB drives or DVD to run before booting into the operating system depending on BIOS setup.
 Step 4: Now, select the drive or the DVD to boot before the main HDD or SDD.
 Step 5: Reboot your PC one more time.
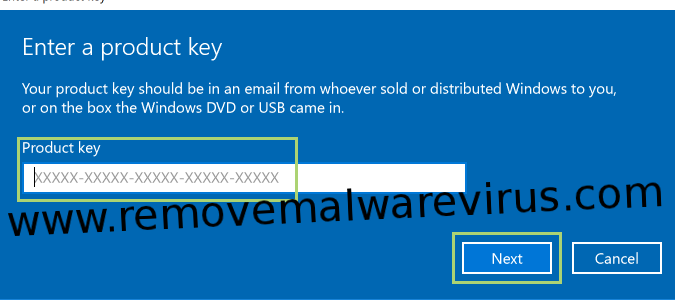
Step 6: After successfully installations, you will be asked to provide your product key. Enter the product key and right after that click on Next.
 Step 7: Now, you can work on Windows 10.
Related Post
How to fix ‘Windows 10 Can’t Connect To This Network’
Related Posts
 New AgeLocker Ransomware Abuses Legit ‘Age’ Encryption Tool
 Five Ways to Check If a Website Is Safe?
 Resolve The Recycle Bin on C:/ is corrupted Error on Windows 10
 (Resolved) Headphones Not Working In Windows 10
 Best Method To Fix The Javaw.exe Error On Windows
 (Resolved) 0X000000A5 Blue Screen Stop Error on Windows