
This post aims to help Windows 10 users to disable Hyper-V. If you are in search of easy way to disable Hyper-V in Windows 10 from longer time then your search definitely ends here. Just go through this post and follow the described instruction carefully in exact order.
Know About Hyper-V in Windows 10
Hyper-V is actually a utility that is capable to replace the Microsoft Virtual system and allows several OS to execute on the single device. For the IT professionals, Computer developers or the technical professionals, this utility make their life too much easier to work with several OS. It actually transforms several OS into the virtual machine that executes parallel on single System. To use this utility, you must required these requirements including :
- Windows 10 Professional.
- Minimum 4 GB RAM.
- CPU must supports VM Monitor Mode Extension.
Hyper-V is really best utility but sometimes, it may cause some problems for Windows user and that situation users need to disable Hyper-V in Windows 10.
Effective Solution To Disable Hyper-V in Windows 10
Solution 1 : Use Control Panel To Disable Hyper-V In Windows 10.
-
- Start your Windows 10 OS.
- In Windows start menu, search for the ‘Turn Windows features on or off’.
- On next, press on Enter key to launch the Windows Features window.
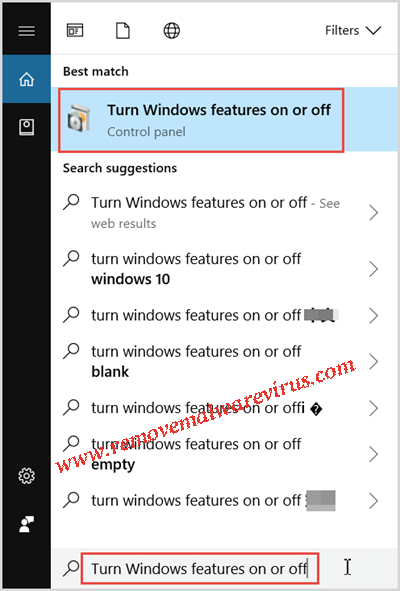
- After that scroll down to the Hyper-V and then disable it by clicking on check-box next to it and then hitting on OK button.
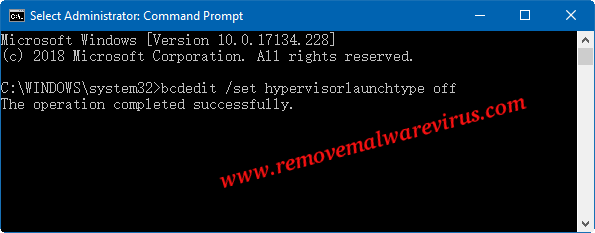
Solution 2 : Use Command Prompt To Disable Hyper-V In Windows 10
-
- After launching your Windows 10 PC, press Win+X key.
- Then press on A key from your keyboard to execute the Command Prompt as administrator.

-
- Now Command Prompt window will be opened on your screen.
- In the command prompt, type bcdedit /set hypervisorlaunchtype off and click on Enter key.
Solution 3 : Disable Hyper-V In Windows 10 By Stopping Its Service
-
- After starting your Windows 10 PC, search for service in Windows start menu and hit on Enter button to launch the window of Component Service.
- In left panel, click on Services option and press on H key of your keyboard.
- Get Hyper-V related services, right-click on it and then choose Stop option.
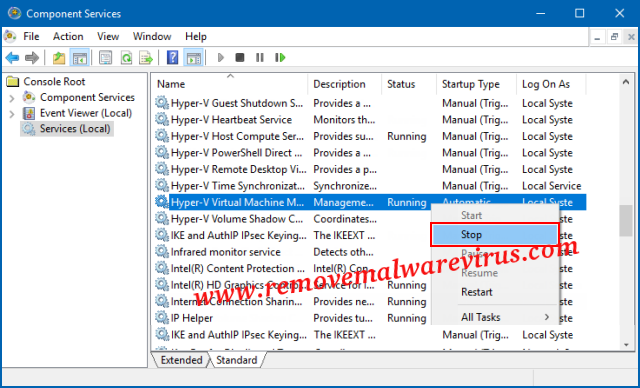
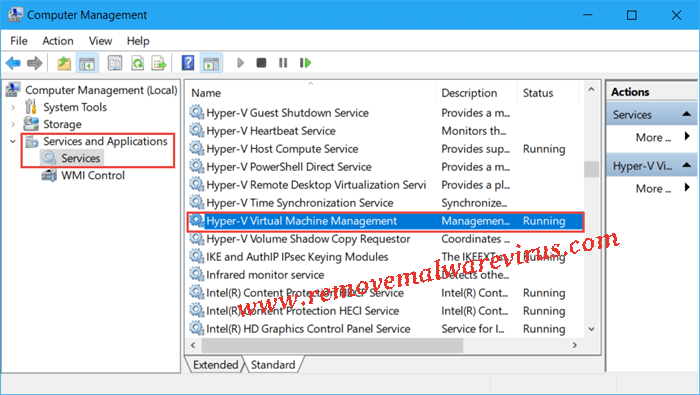
Solution 4 : Disable Hyper-V In Windows 10 OS Via Computer Management
-
- Start your Windows 10 OS.
- Right-click on the icon of This PC and choose Manage option.
- Now, Computer Management window will be displayed on your screen.
- Expand Services and Applications >> choose Services.
- Double-click on Hyper-V Virtual Management.
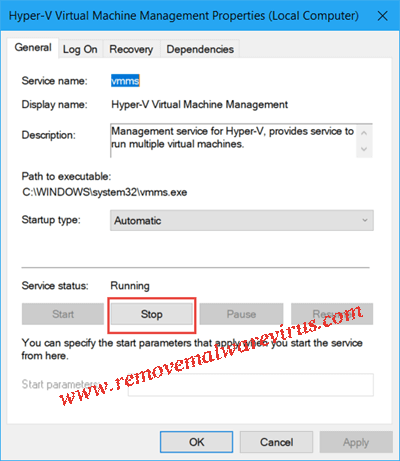
-
- After that click on Stop button to disable Hyper-V in Windows 10.
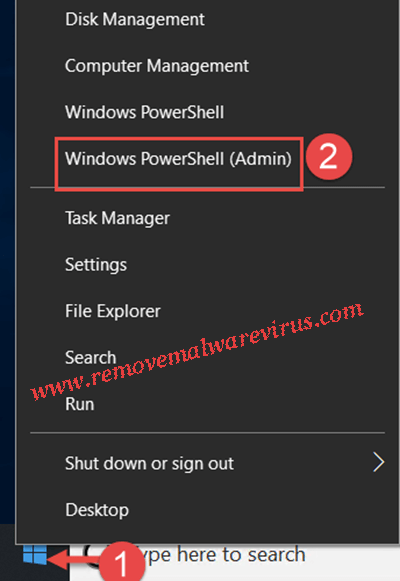
Solution 5 : Use PowerShell To Turn Off or Disable Hyper-V in Windows 10
-
- Right-click on Windows 10 start icon and choose option of Windows PowerShell (admin).
-
- In the opened Windows PowerShell, type Disable-WindowsOptionalFeature -Online -FeatureName Microsoft-Hyper-V-All and press on Enter key.
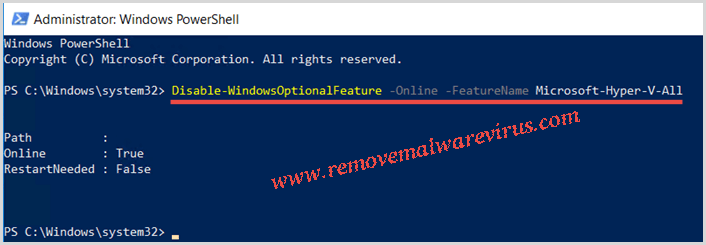
- The makes the effects, restart your Windows 10 OS.
Related Posts
 New AgeLocker Ransomware Abuses Legit ‘Age’ Encryption Tool
 Five Ways to Check If a Website Is Safe?
 Resolve The Recycle Bin on C:/ is corrupted Error on Windows 10
 (Resolved) Headphones Not Working In Windows 10
 Best Method To Fix The Javaw.exe Error On Windows
 (Resolved) 0X000000A5 Blue Screen Stop Error on Windows